Install Ubuntu Server 26.04 LTS Step by Step for Beginners
This guide walks through the Ubuntu Server installer one screen at a time. It follows the screenshots from a working development install and explains what to do on each screen.
This is the Ubuntu Server text installer. It does not use a mouse like a normal desktop program. Use the keyboard:
- Use the up and down arrow keys to move.
- Press Enter to open a selected item or confirm a button.
- Press Space to check or uncheck a box.
- Use Tab to move between fields and buttons.
- When this guide says "select Done," move the green highlight to
Doneand press Enter.
This installer flow uses buttons such as Done, Continue, Save, Create, and Reboot Now. If your installer shows Next on a similar screen, select Next and press Enter to move forward.
Important: installing Ubuntu can erase the disk you select. Do this only on the correct server, virtual machine, or computer.
Before You Start
Have this information ready:
- The Ubuntu Server installer ISO or USB.
- The server or virtual machine where Ubuntu will be installed.
- A network cable or working network connection.
- The network details if you are using a fixed IP address.
- The username, server name, and password you want to use.
The screenshots below use these example network values:
- IP address:
192.168.50.209 - Subnet:
192.168.50.0/24 - Gateway:
192.168.50.1 - DNS servers:
192.168.50.1,4.4.4.4,8.8.8.8
Use your own network values if your network is different.
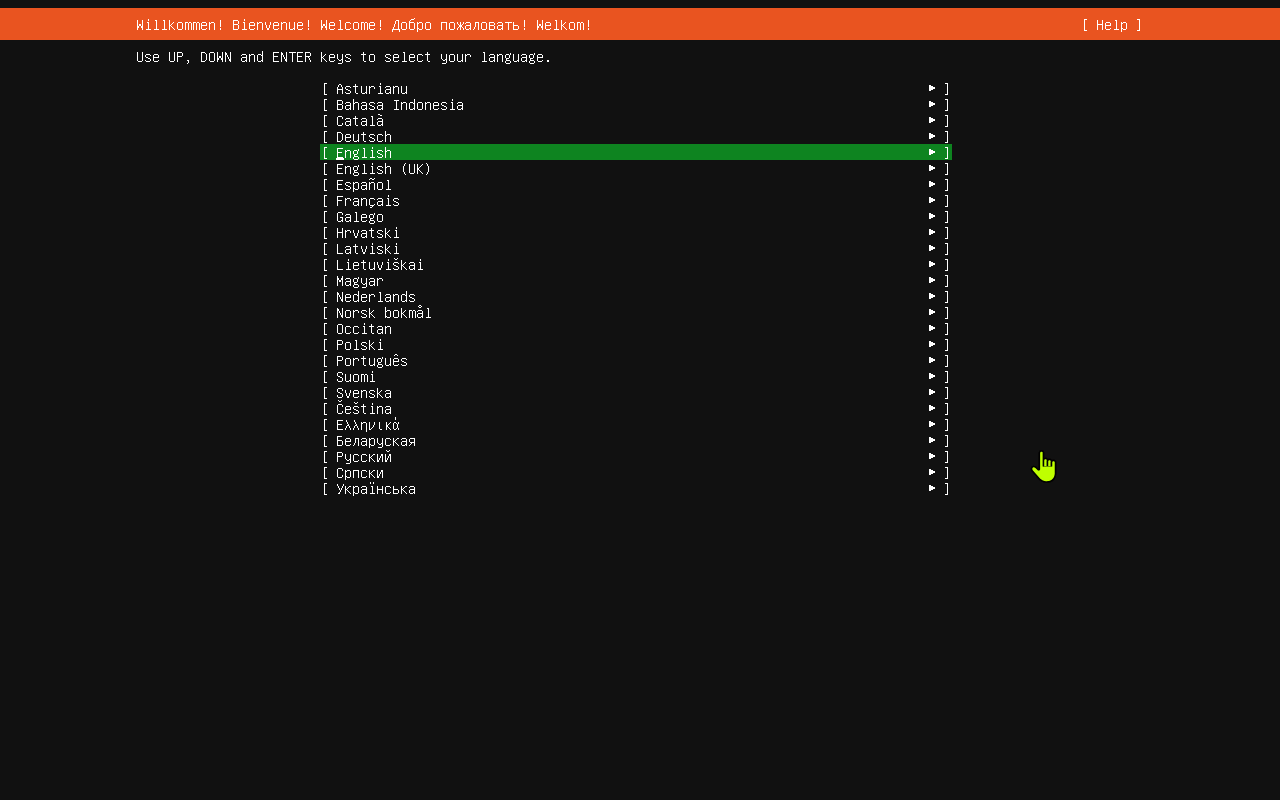
1. Choose the Installer Language
The first screen asks which language to use during the install.
English is highlighted in the screenshot. Leave it selected unless you need another language.
Press Enter to continue.
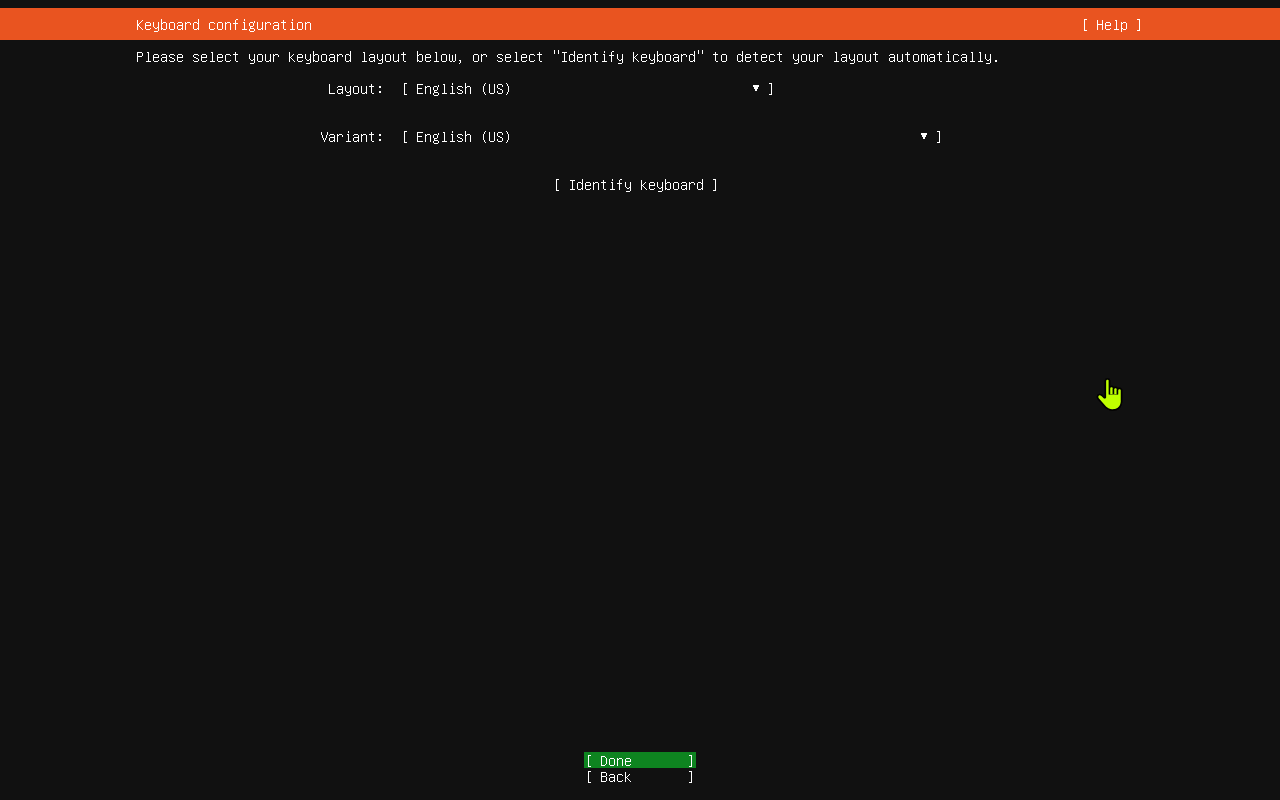
2. Choose the Keyboard Layout
The keyboard screen controls how Ubuntu reads your keyboard.
In this install, both fields are set to English (US):
Layout:English (US)Variant:English (US)
If your keyboard is a normal US keyboard, leave these settings as they are.
Select Done and press Enter.
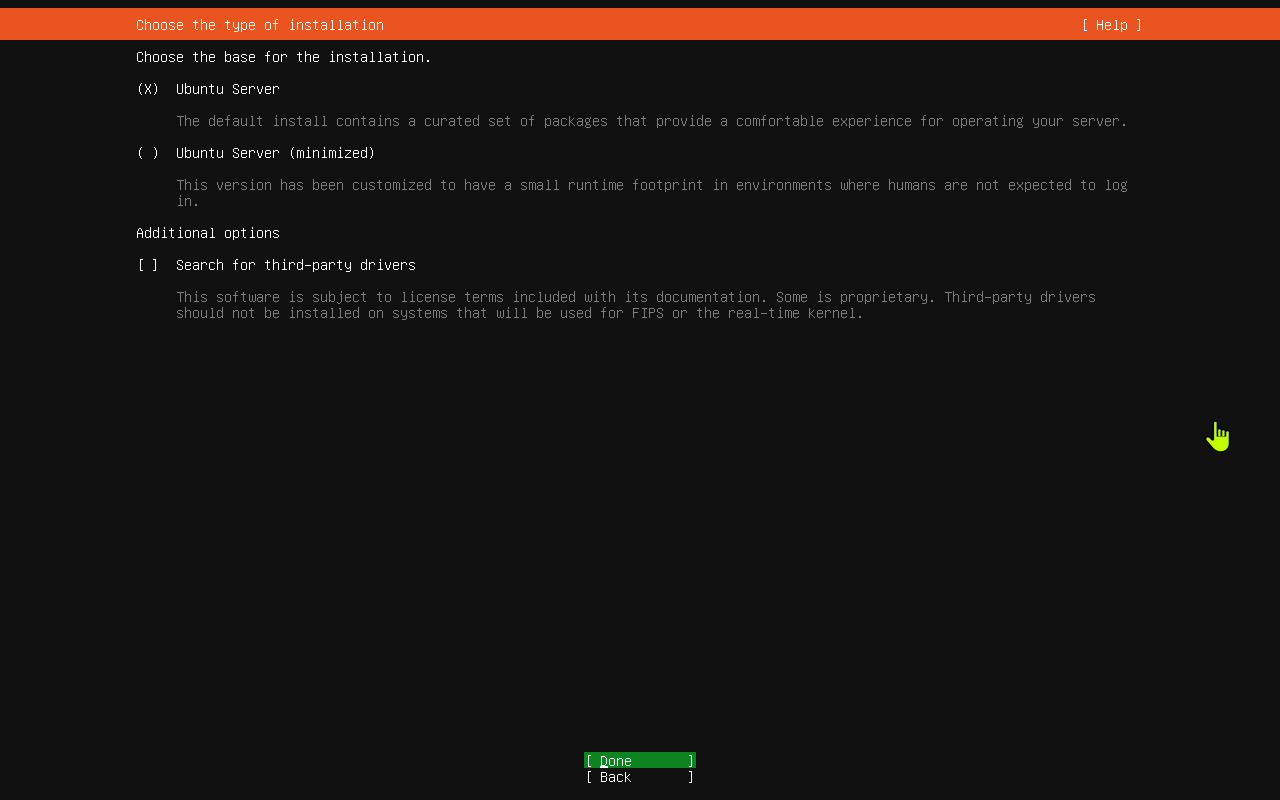
3. Choose the Type of Installation
This screen asks what kind of Ubuntu Server install you want.
The selected option is Ubuntu Server. This is the standard option and is the right choice for most servers.
The minimized option installs fewer packages. Do not choose that unless you already know you need it.
Leave Search for third-party drivers unchecked unless you know your hardware needs a special driver.
Select Done and press Enter.
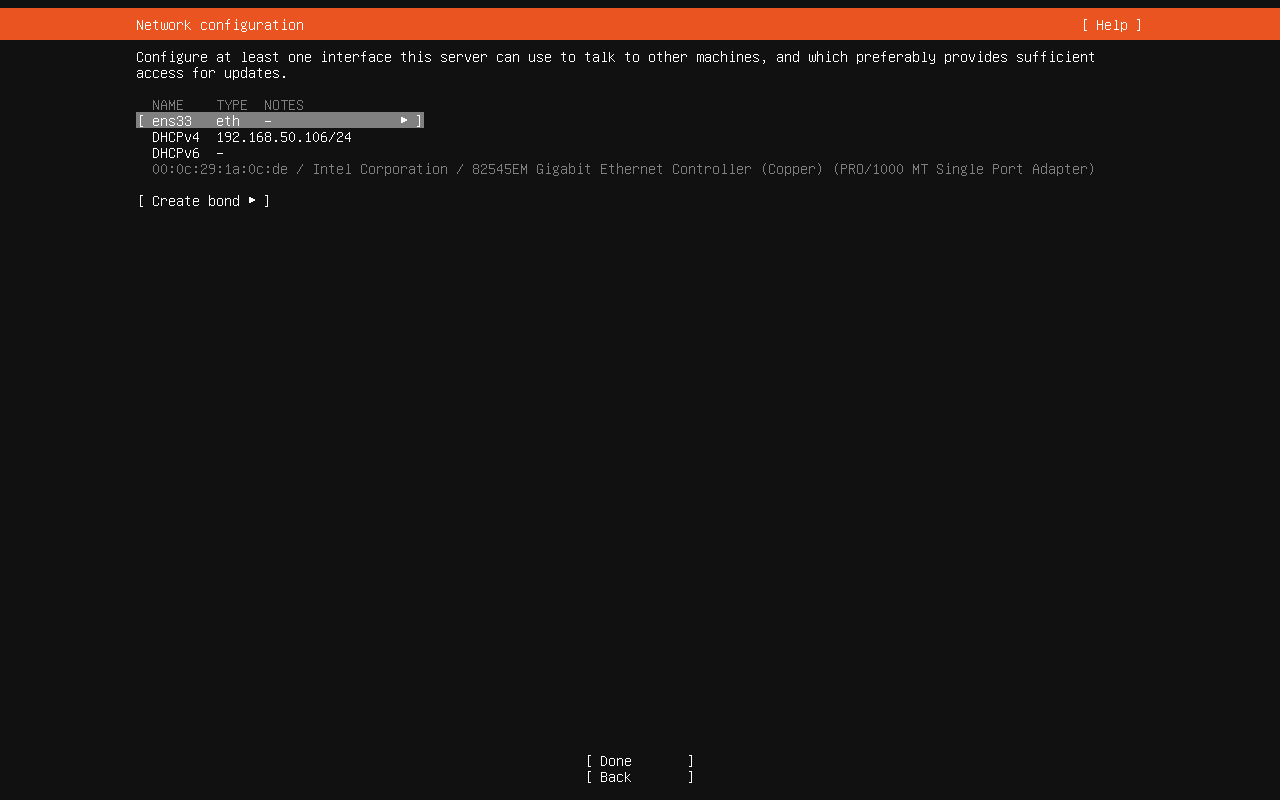
4. Review the Network Connection
The network screen shows the network card and the IP address Ubuntu received automatically.
In the screenshot, the network card is named ens33 and it received 192.168.50.106/24 by DHCP.
If you want Ubuntu to keep using automatic network settings, you can select Done and press Enter.
In this example, the install changes the server to a fixed IP address, so continue with the next step.
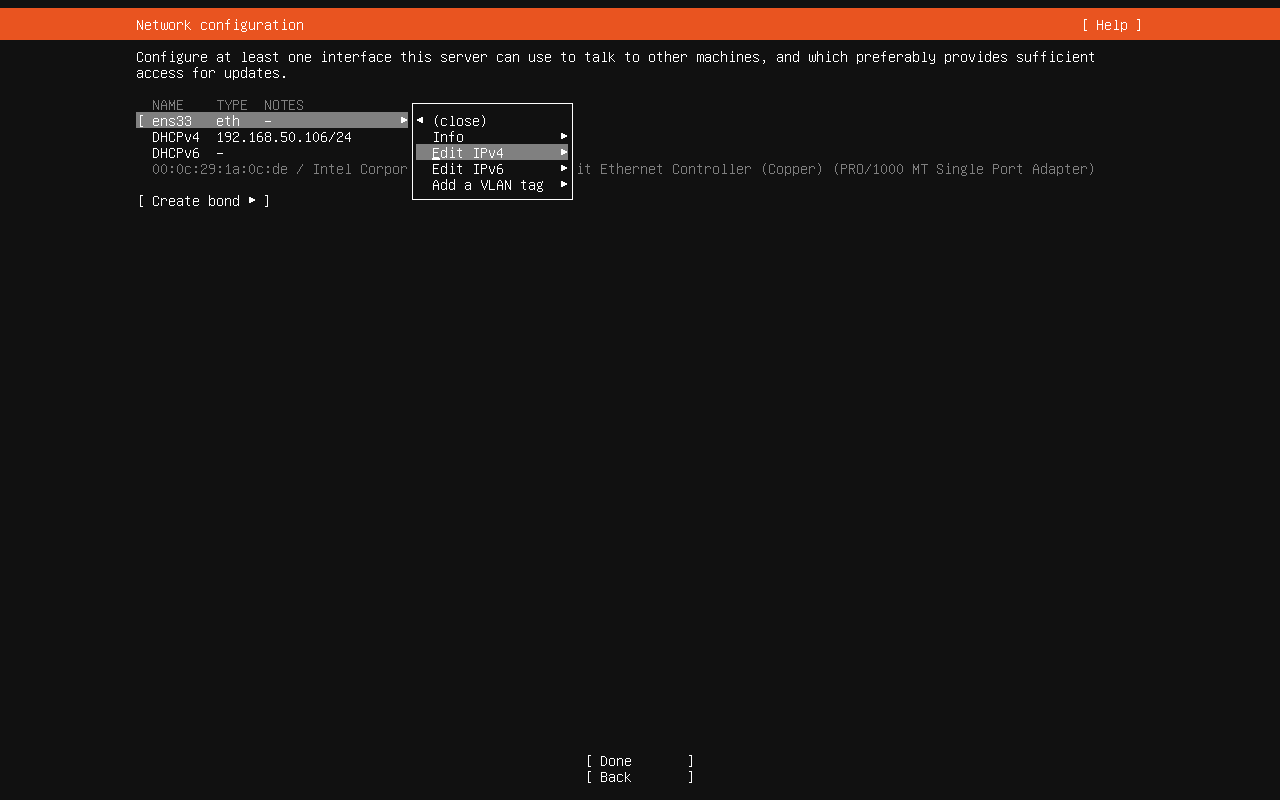
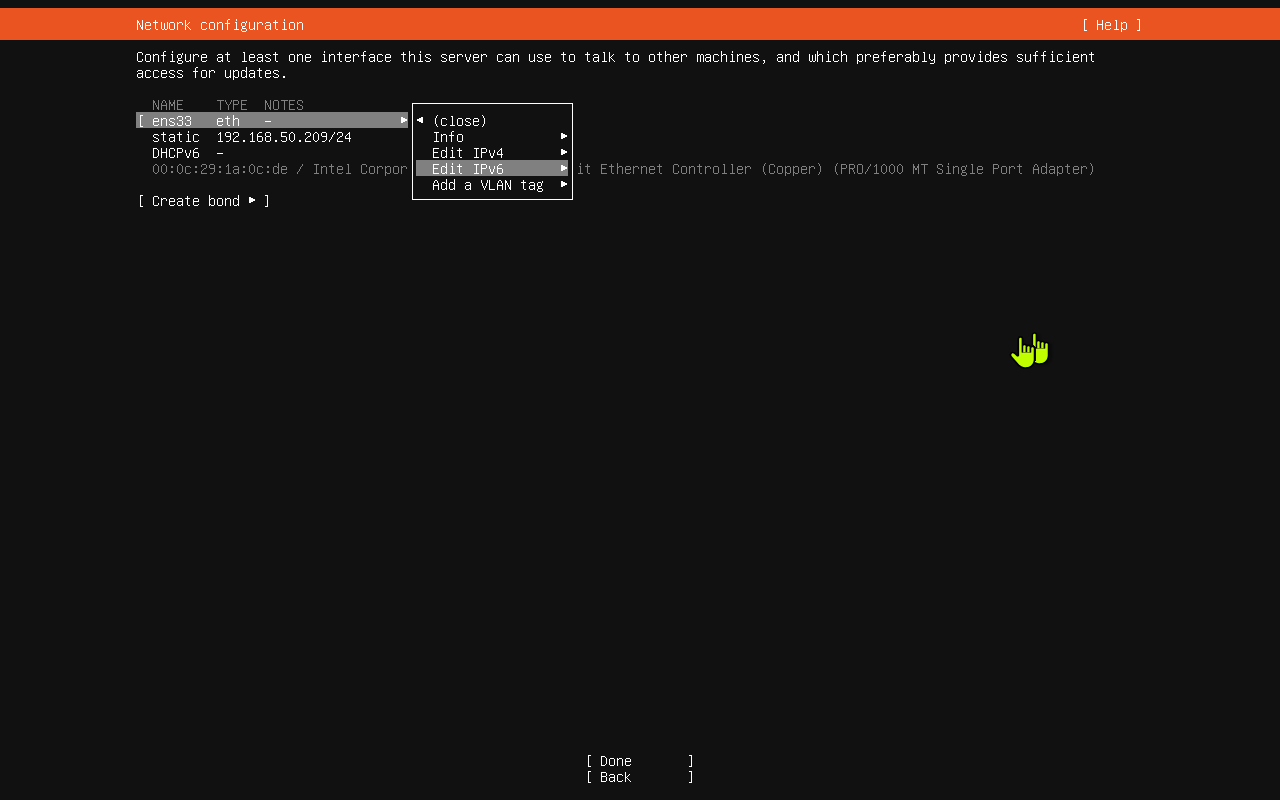
5. Open the Network Card Menu
Highlight the network card line, which is ens33 in the screenshot.
Press Enter to open the menu.
Choose Edit IPv4 and press Enter.
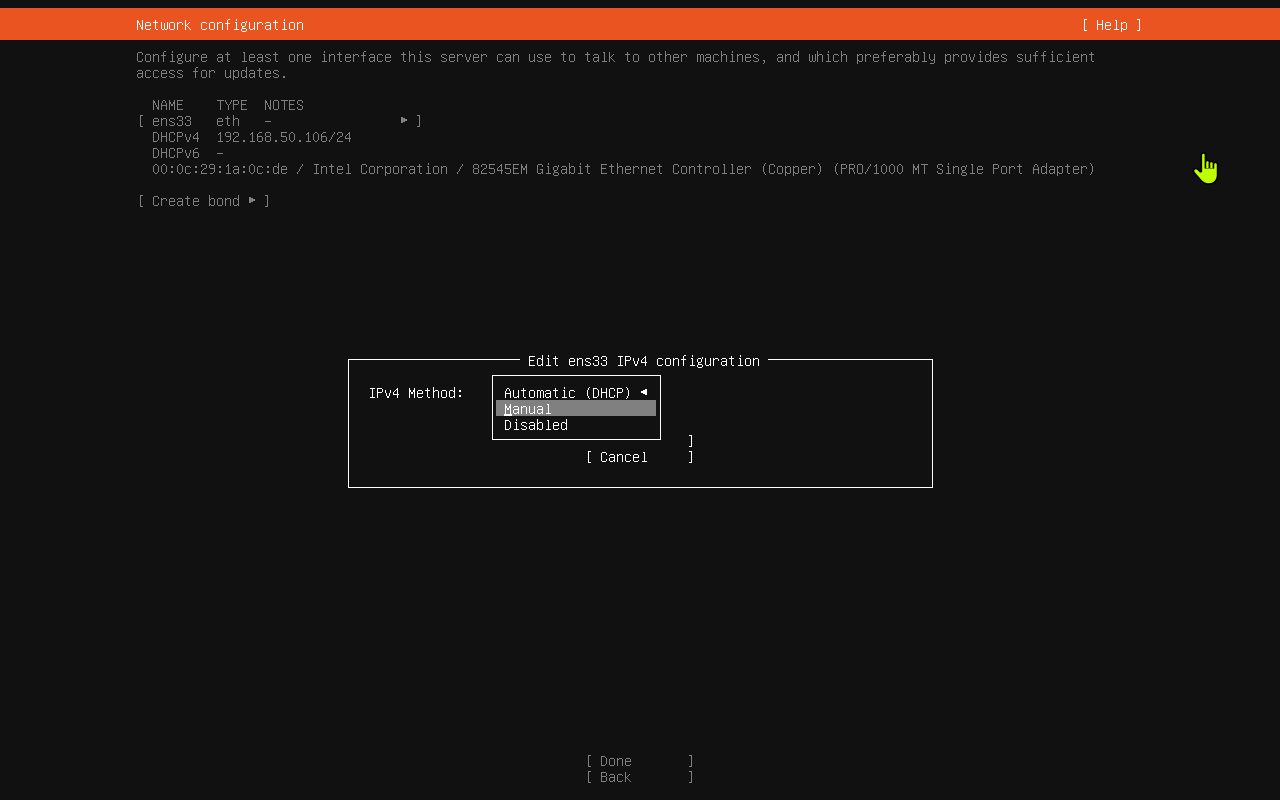
6. Change IPv4 from Automatic to Manual
The IPv4 method is set to Automatic (DHCP).
Open the IPv4 Method dropdown and choose Manual.
Manual means you will type in the IP address instead of letting the router assign one automatically.
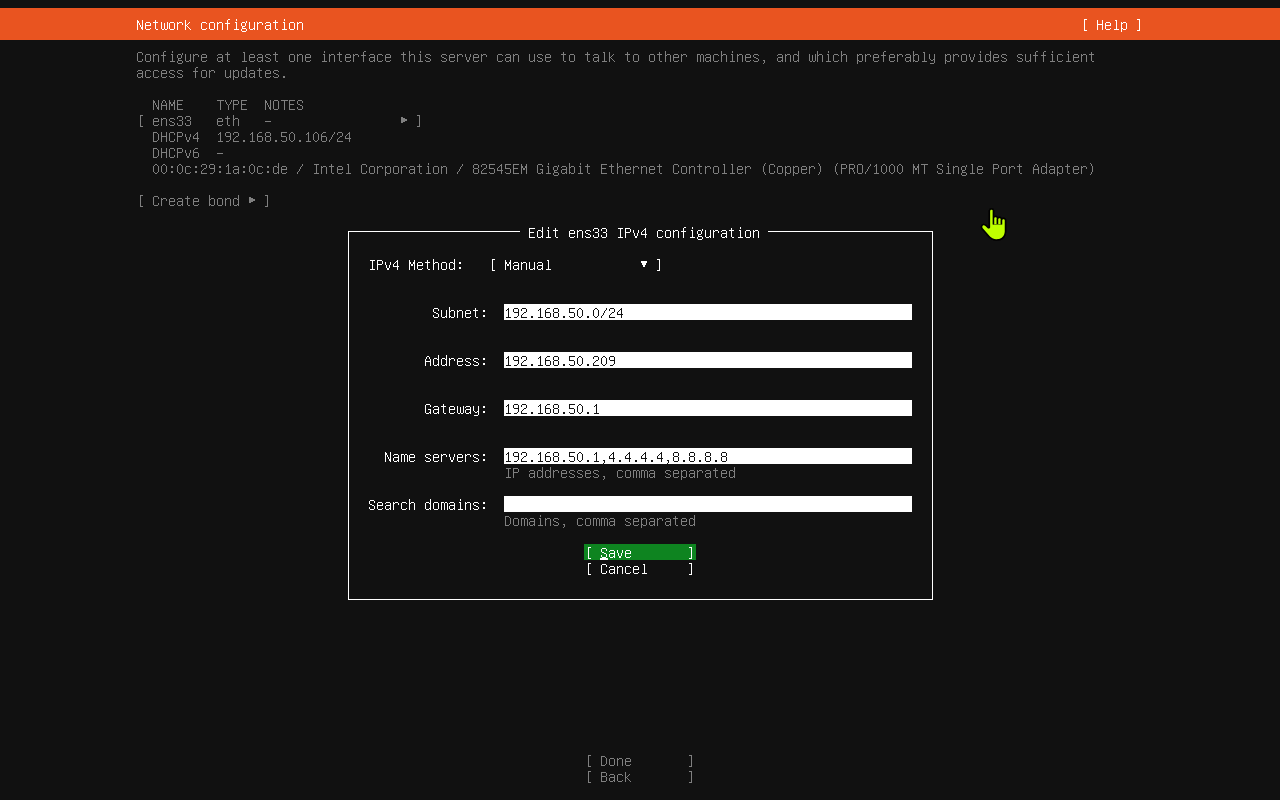
7. Enter the Manual IPv4 Settings
Fill in the network fields.
The screenshot uses:
Subnet:192.168.50.0/24Address:192.168.50.209Gateway:192.168.50.1Name servers:192.168.50.1,4.4.4.4,8.8.8.8Search domains: blank
After entering the values, select Save and press Enter.
8. Confirm the Fixed IPv4 Address
You are back on the network screen.
The network card now shows a static address:
192.168.50.209/24
The menu is still open in the screenshot. If it is open on your screen, choose (close) or press Escape to close it.
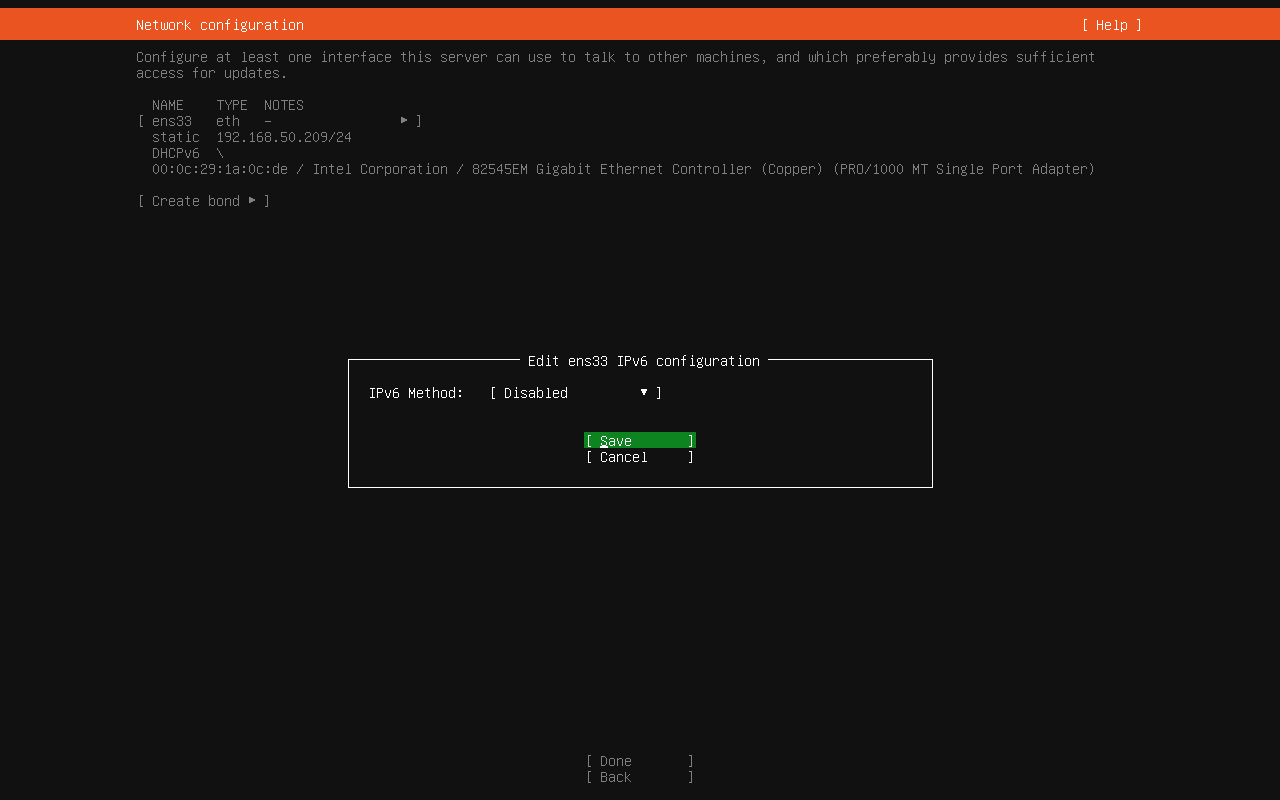
9. Disable IPv6 If You Do Not Need It
The screenshot shows the IPv6 screen with IPv6 Method set to Disabled.
If you do not use IPv6 on this server, choose Disabled.
Select Save and press Enter.
10. Finish the Network Screen
The network screen now shows the fixed IPv4 address and no IPv6 address.
Review the address one more time.
Select Done and press Enter.

11. Leave Proxy Blank Unless You Have One
The proxy screen is only for networks that require a proxy server to reach the internet.
Most home, office, and virtual-machine networks do not need this.
Leave Proxy address blank.
Select Done and press Enter.

12. Confirm the Ubuntu Archive Mirror
Ubuntu uses an archive mirror to download updates and packages.
The screenshot uses:
http://us.archive.ubuntu.com/ubuntu/
The installer tests the mirror. When it says the mirror passed tests, select Done and press Enter.

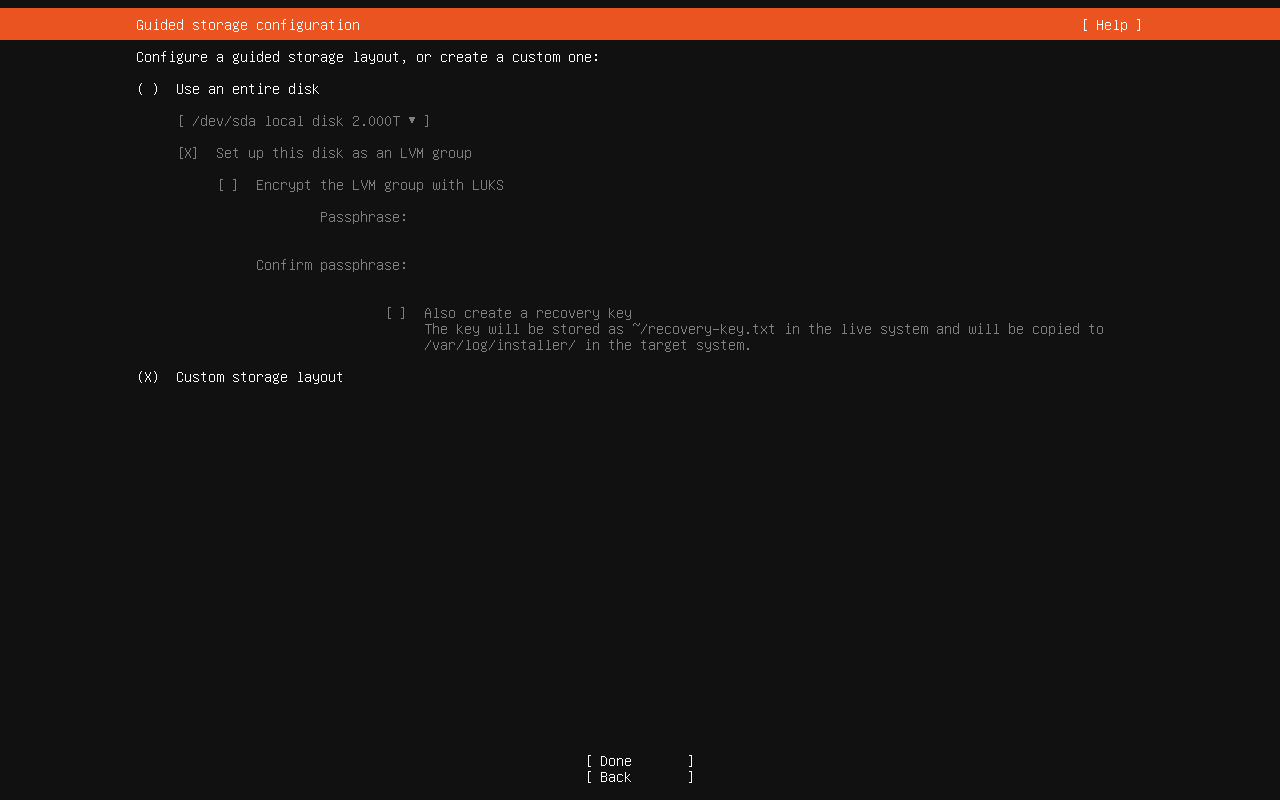
13. Choose the Storage Layout
The storage screen controls how Ubuntu will use the disk.
The screenshot selects Custom storage layout.
Custom storage gives you direct control over partitions. If you are new and do not need a special layout, Use an entire disk is usually simpler. This guide follows the screenshot and uses the custom layout.
Select Custom storage layout.
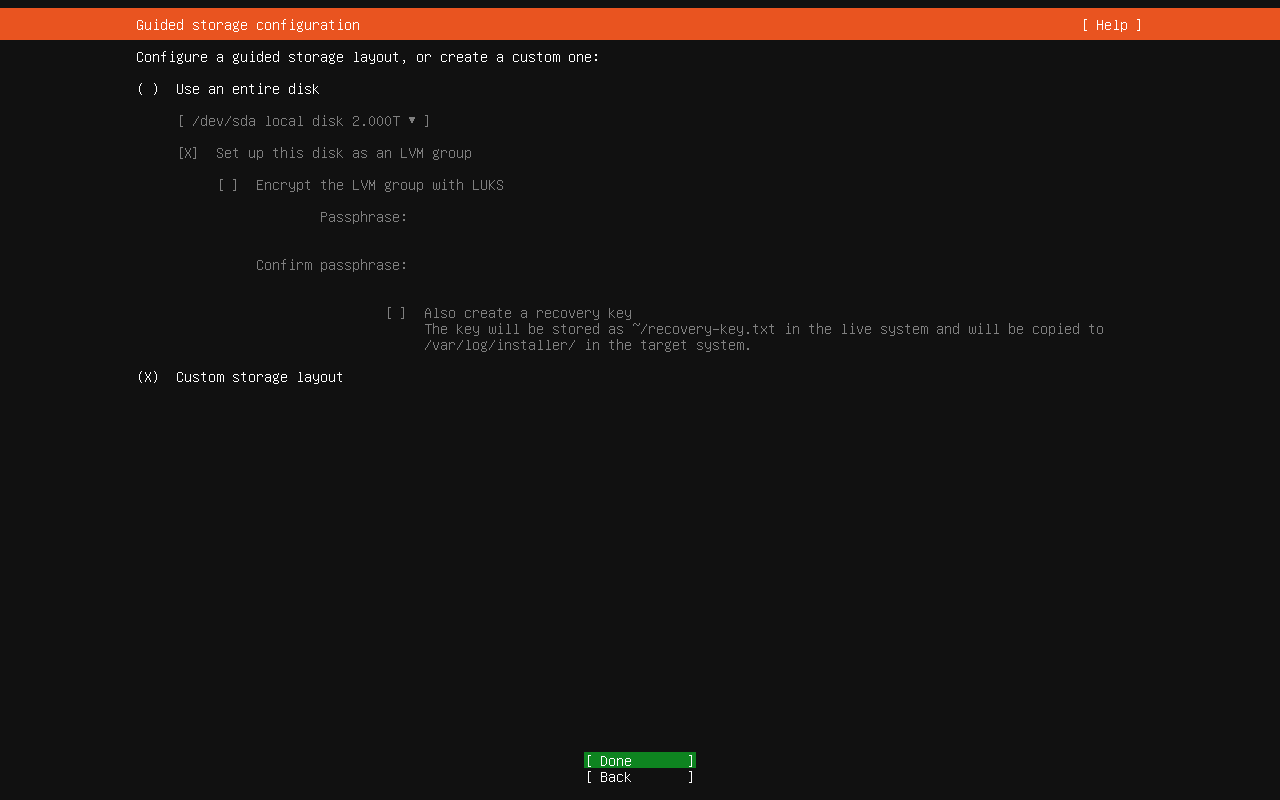
14. Continue with the Custom Storage Layout
Make sure Custom storage layout is selected.
Select Done and press Enter.
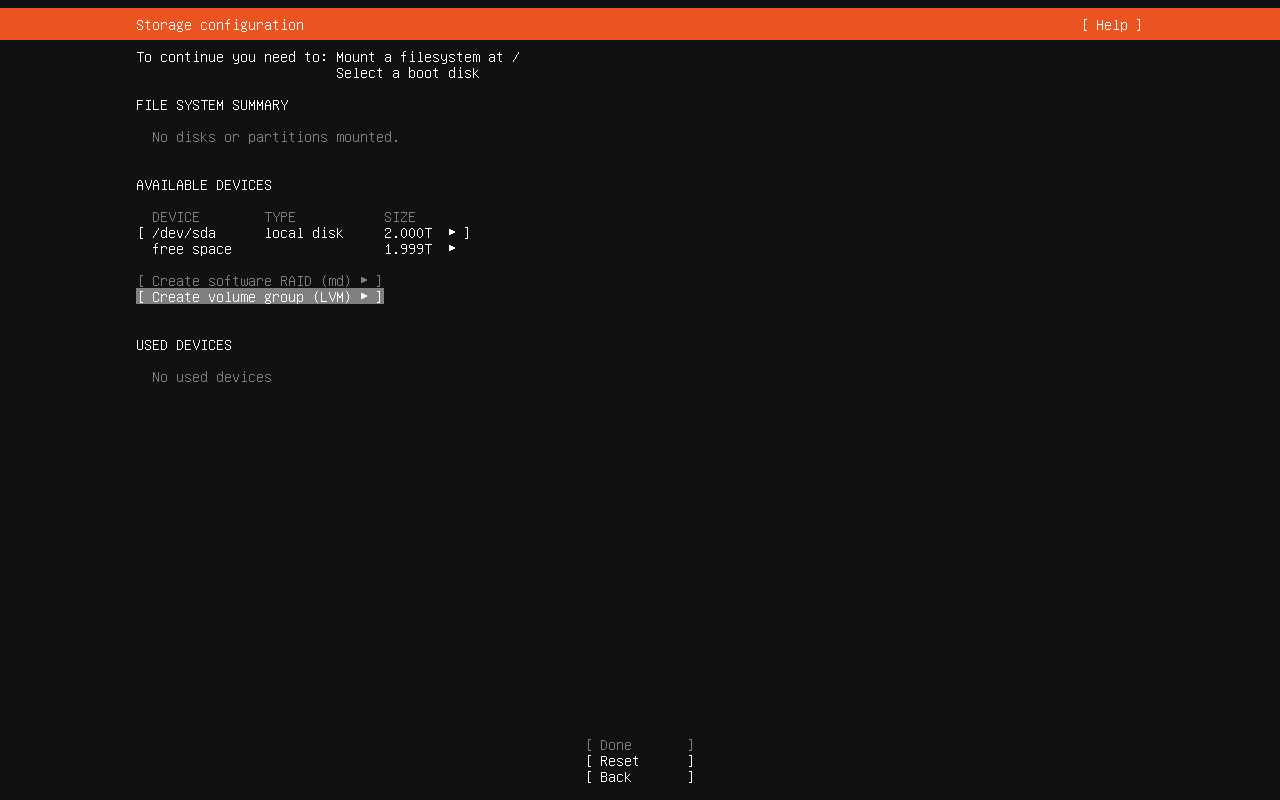
15. Review the Available Disk
The storage configuration screen shows the available disk.
In the screenshot:
- The disk is
/dev/sda. - The disk size is
2.000T. - The free space is
1.999T.
There are no partitions mounted yet, so Ubuntu says it still needs a filesystem mounted at / and a boot disk.
Highlight the free space line under /dev/sda.
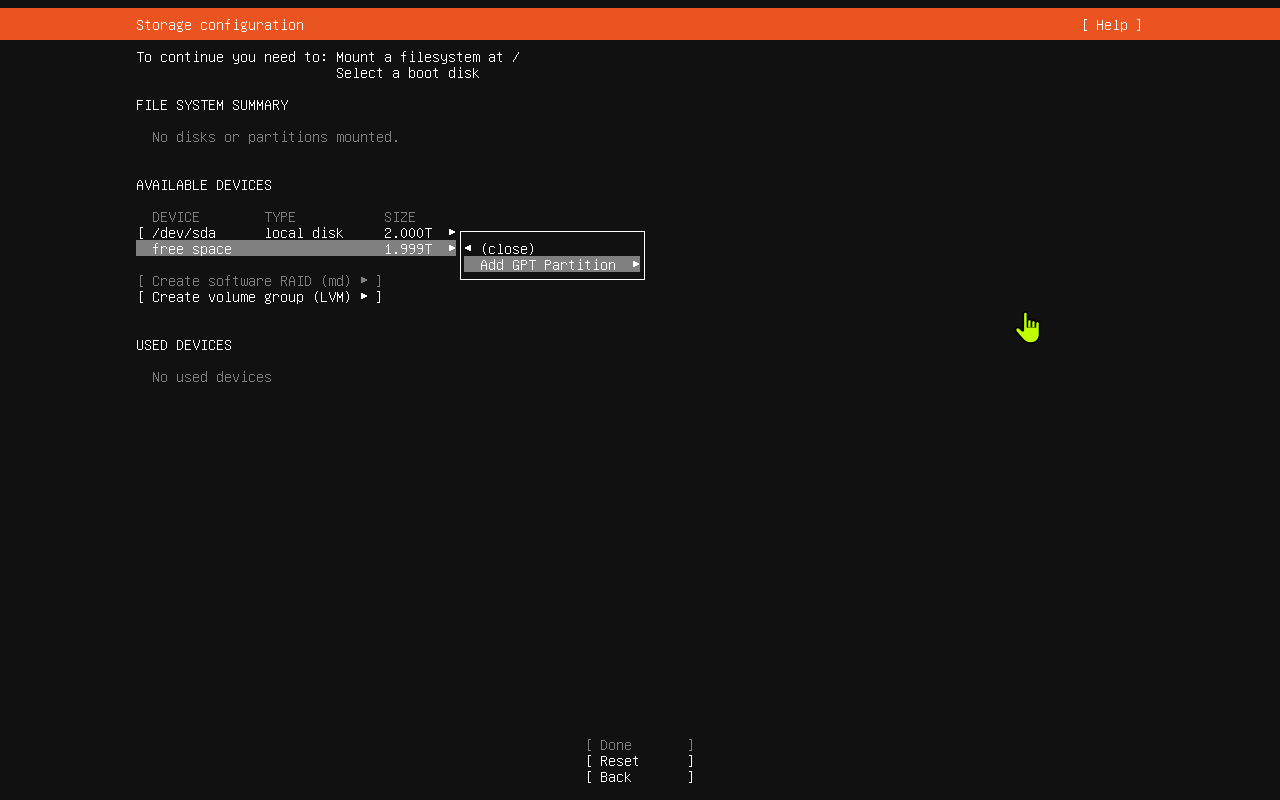
16. Add a GPT Partition
With the free space line highlighted, press Enter.
Choose Add GPT Partition and press Enter.
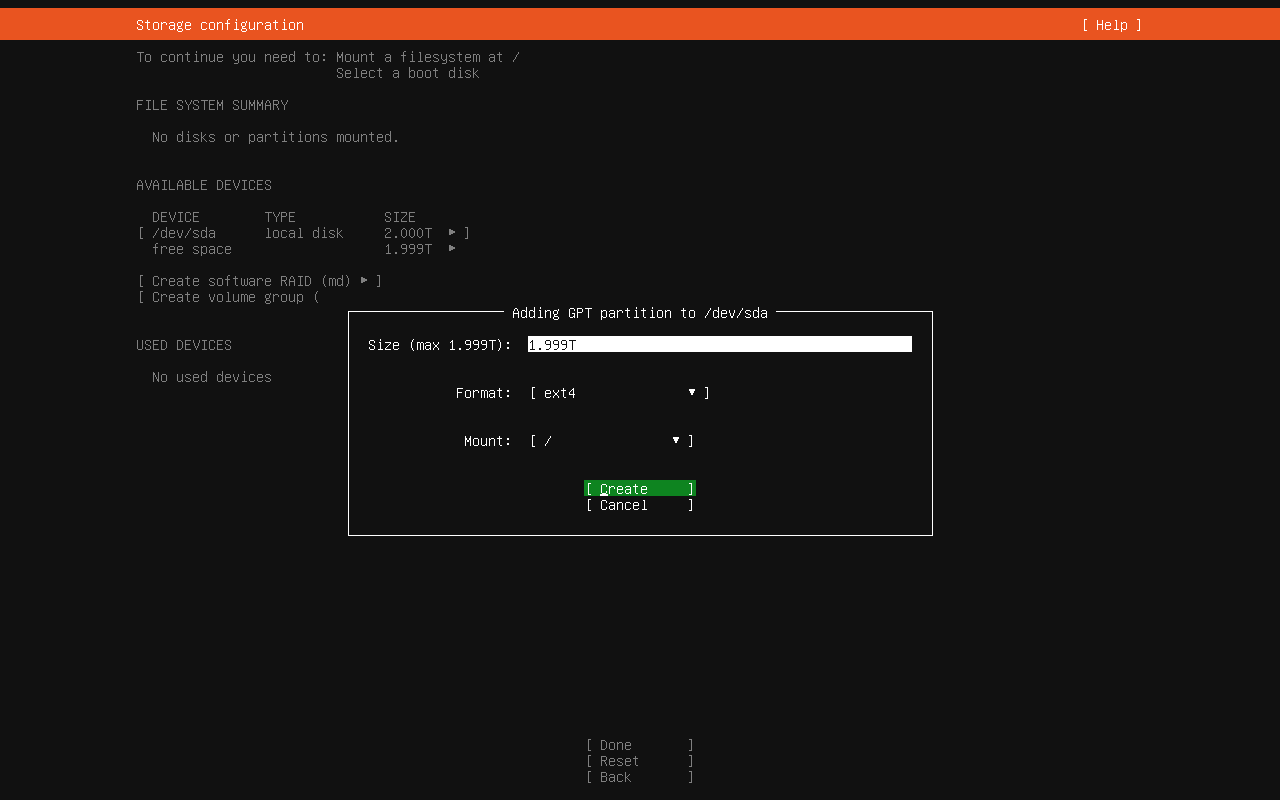
17. Create the Root Filesystem Partition
The partition screen asks how to use the free space.
The screenshot uses:
Size:1.999TFormat:ext4Mount:/
The / mount point is the main Ubuntu filesystem. It is where Ubuntu itself will be installed.
After the fields match what you want, select Create and press Enter.
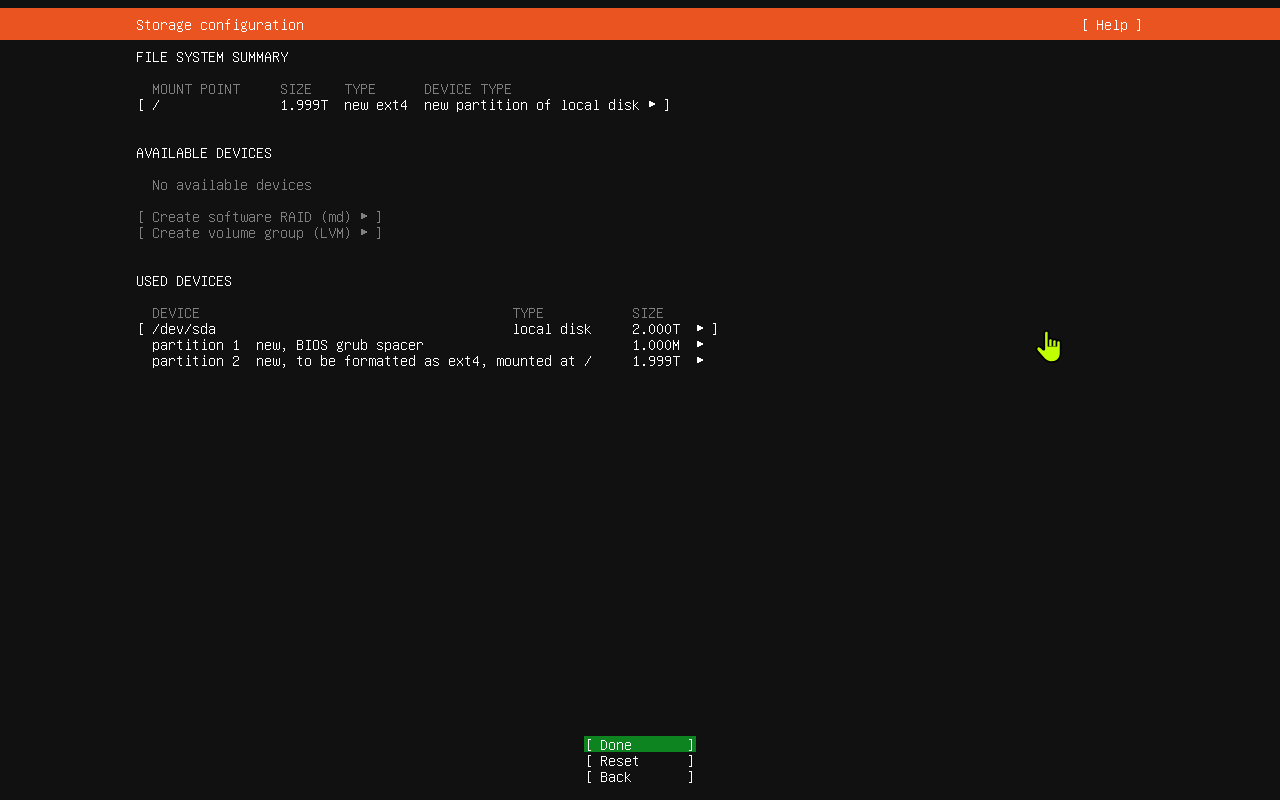
18. Review the Storage Summary
The file system summary now shows a new root filesystem:
- Mount point:
/ - Size:
1.999T - Type:
new ext4
The used devices section also shows:
partition 1: BIOS grub spacerpartition 2: ext4 mounted at/
Select Done and press Enter.
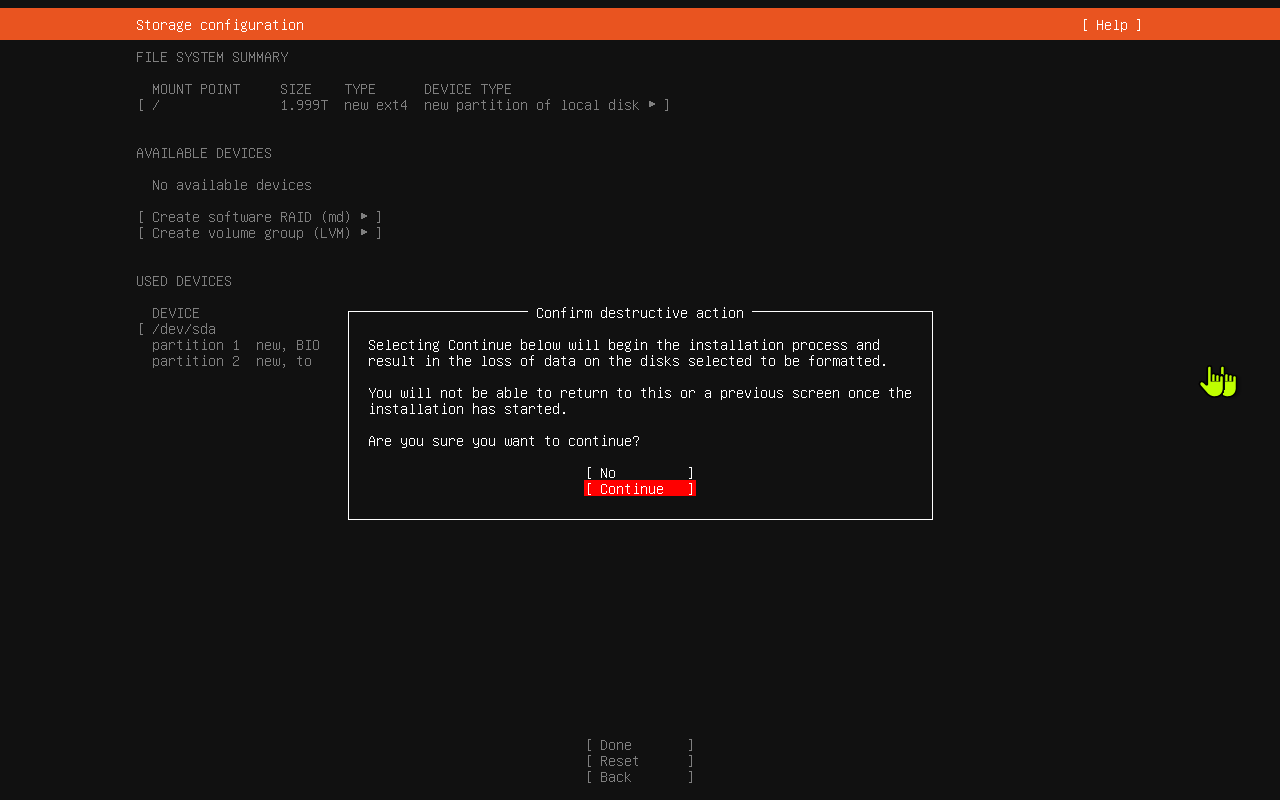
19. Confirm the Destructive Disk Action
Ubuntu warns that continuing will begin the installation and can erase data on the selected disk.
Read this screen carefully.
If this is the correct disk and you are ready to install, select Continue and press Enter.
If you are not sure, choose No.
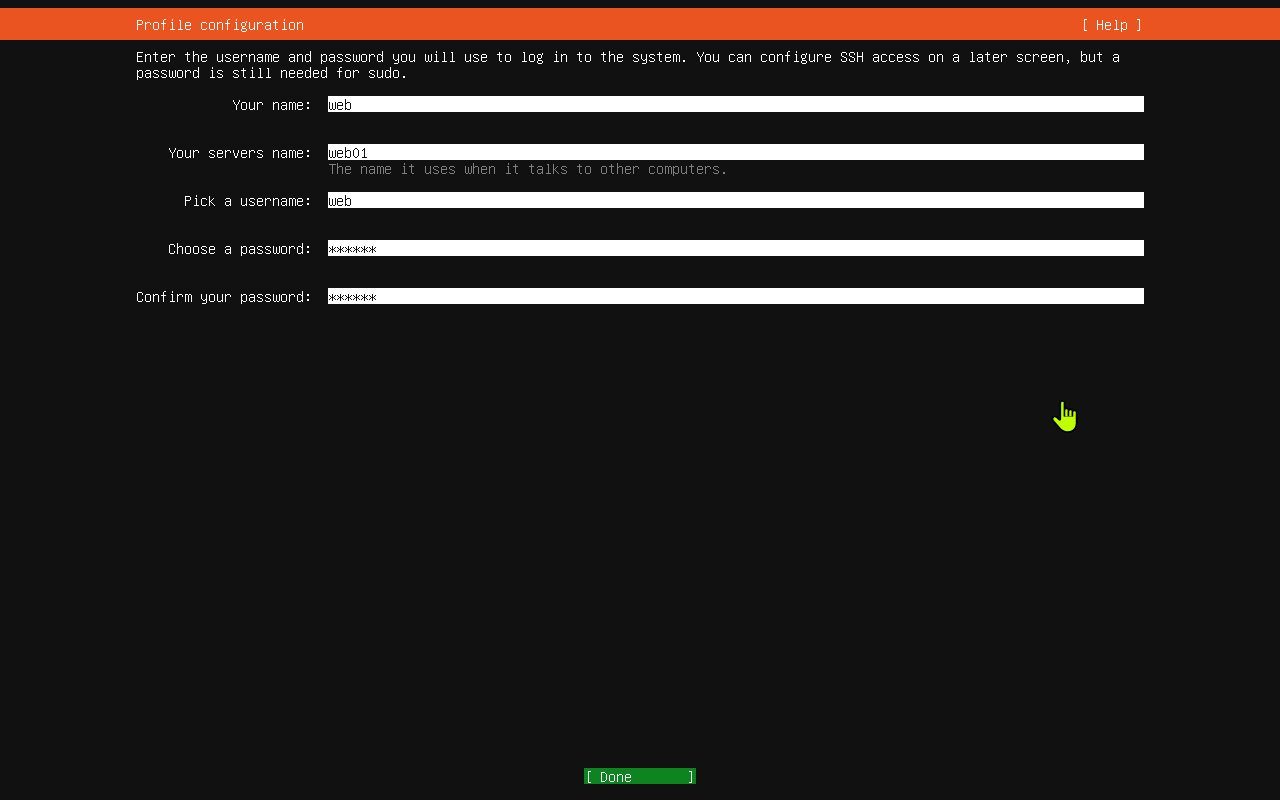
20. Create the Login Profile
This screen creates the user account you will use to log in.
The screenshot uses:
Your name:webYour server's name:web01Pick a username:web- Password fields: hidden with asterisks
Use names that make sense for your server. Write the password down somewhere safe before continuing.
Select Done and press Enter.
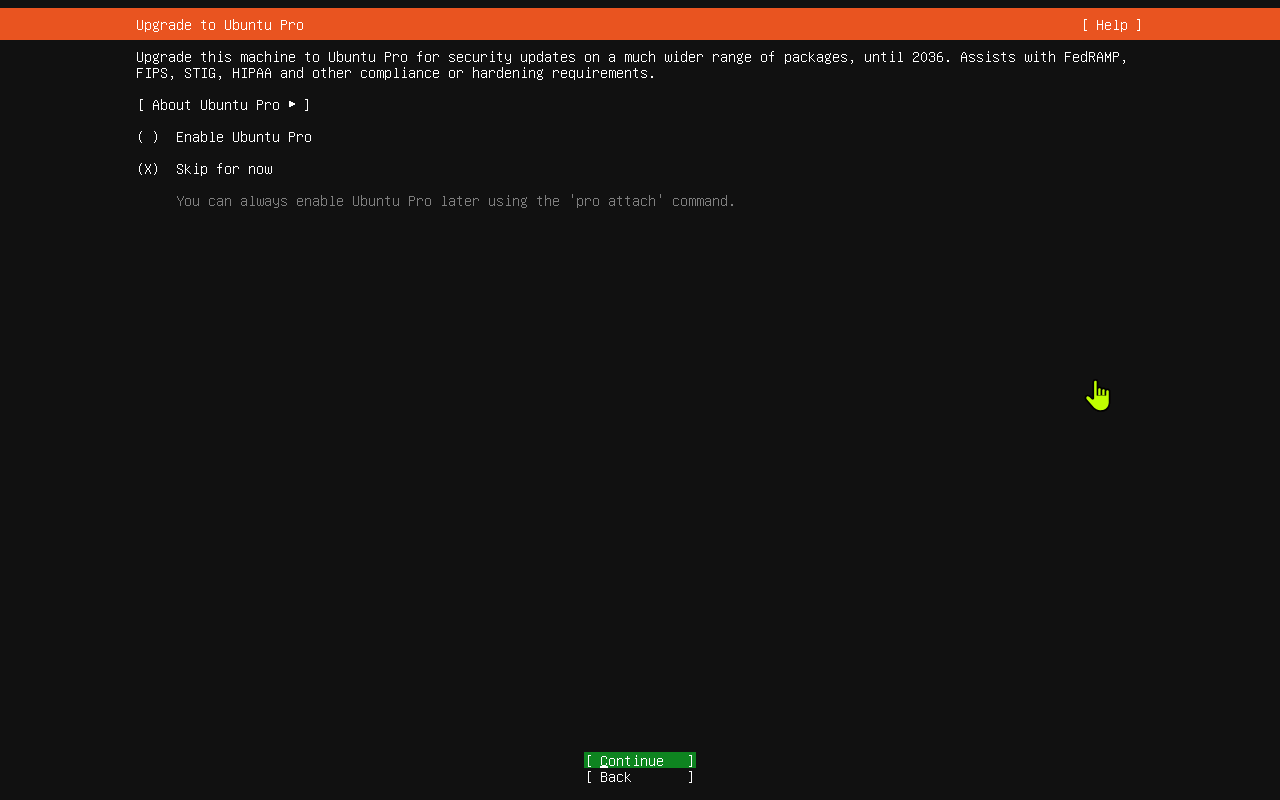
21. Skip Ubuntu Pro for Now
Ubuntu Pro is optional.
The screenshot selects Skip for now.
Leave Skip for now selected unless you already have an Ubuntu Pro account and know you want to attach this server during install.
Select Continue and press Enter.
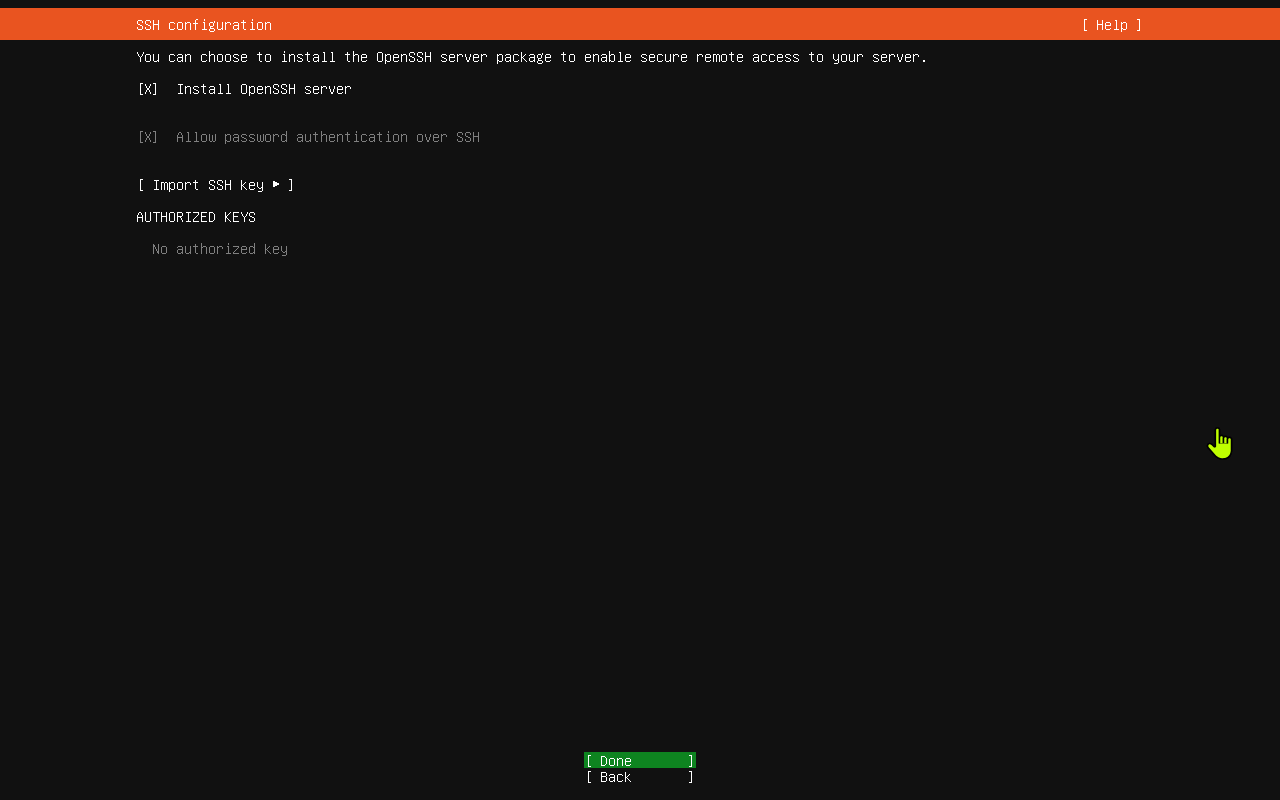
22. Choose Whether to Install OpenSSH Server
OpenSSH lets you connect to the server remotely from another computer.
The screenshot checks:
Install OpenSSH server
It also shows:
Allow password authentication over SSH
If this server will be managed remotely, keep Install OpenSSH server checked.
If you are not sure, installing OpenSSH is usually helpful for a server.
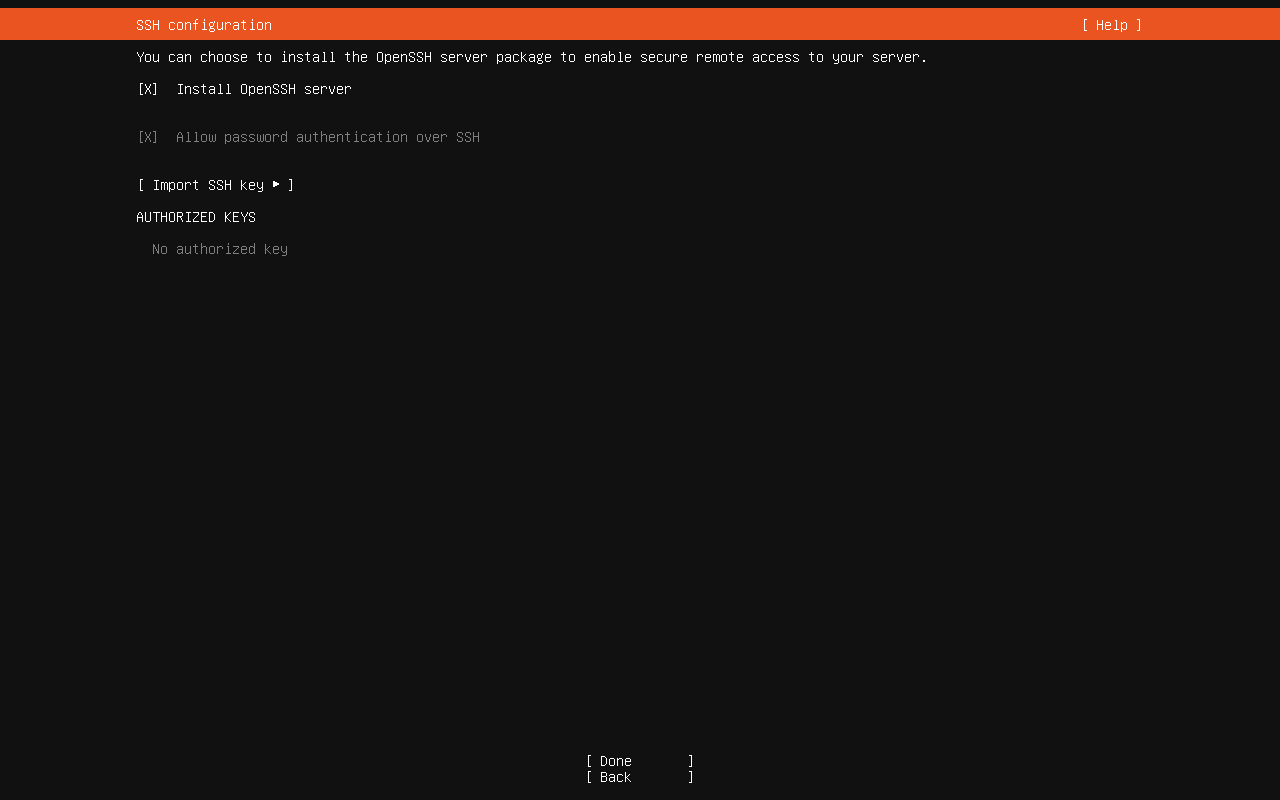
23. Finish the SSH Screen
Review the SSH settings.
The screenshot does not import an SSH key and shows no authorized keys.
Select Done and press Enter.
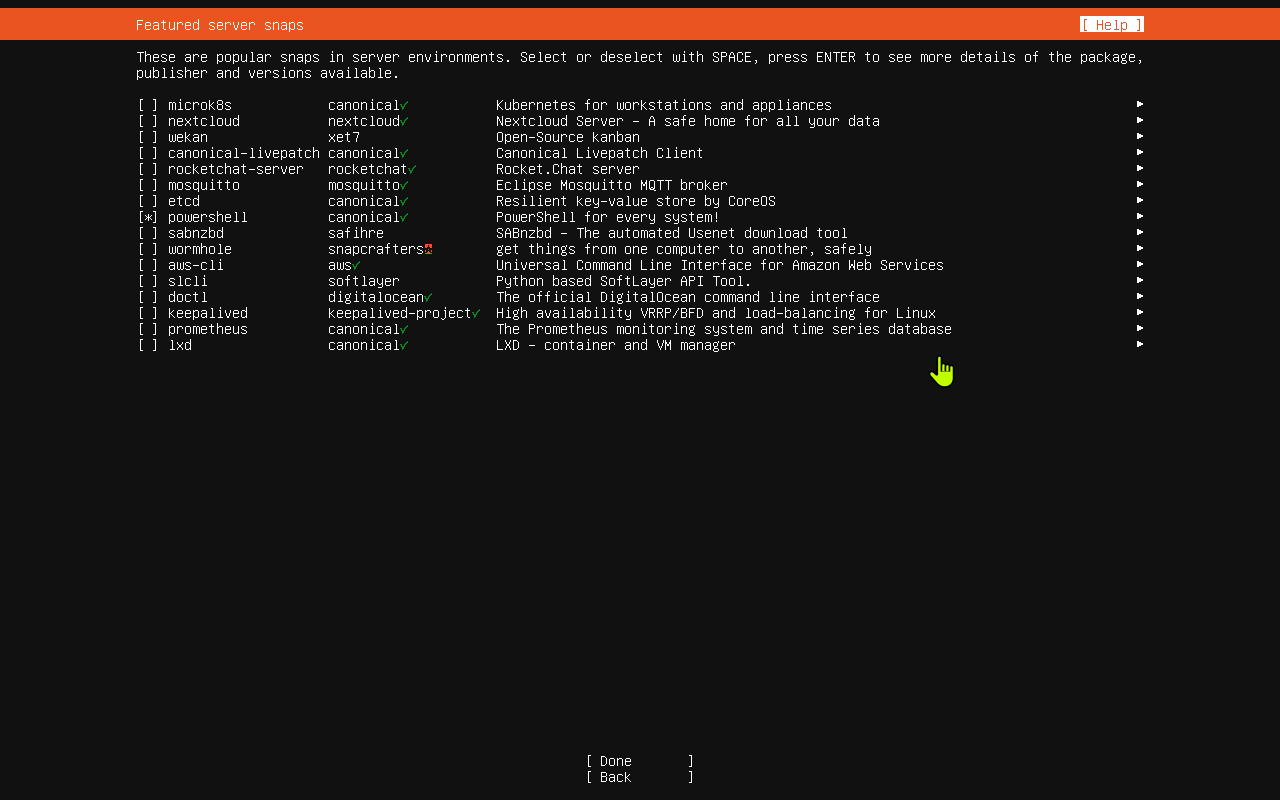
24. Choose Optional Server Snaps
This screen lists optional server packages called snaps.
The screenshot has powershell selected.
If you want PowerShell available on this Ubuntu server, check powershell.
If you do not need any of these optional packages, leave them unchecked.
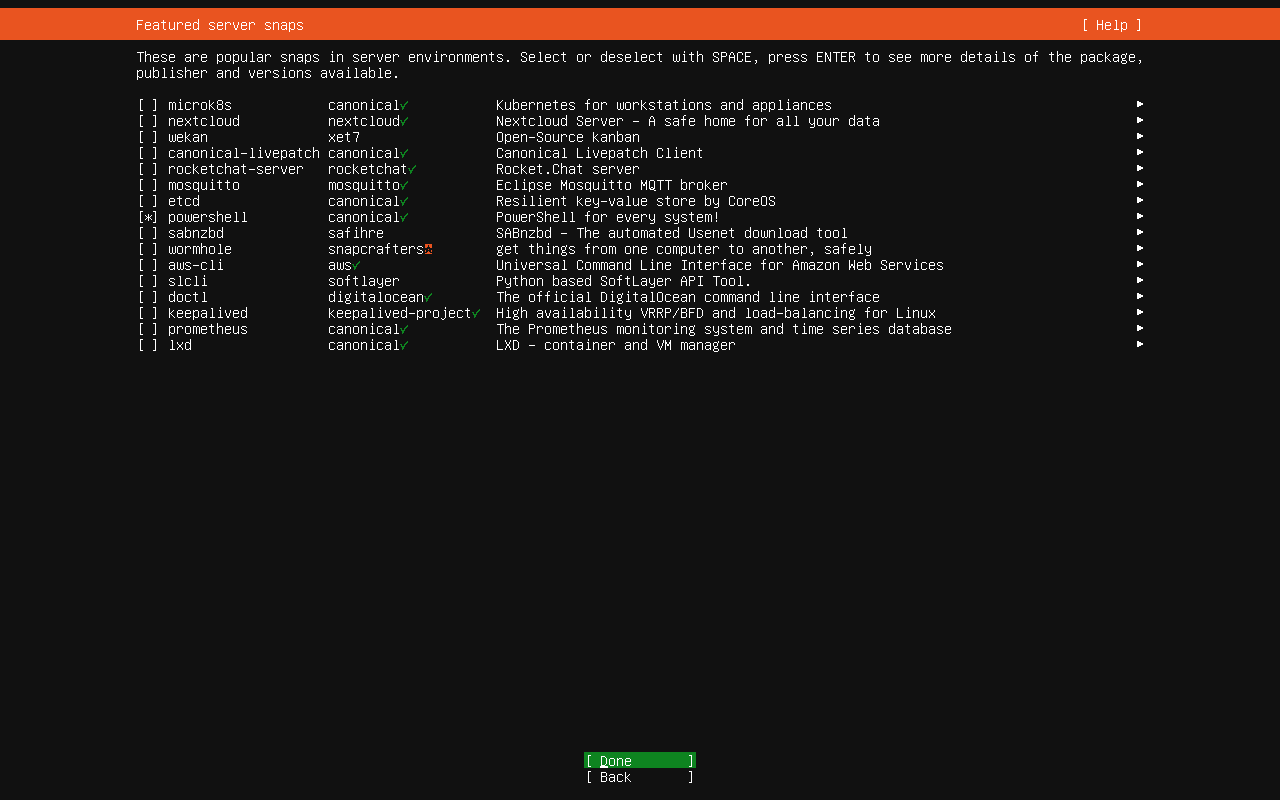
25. Finish the Server Snaps Screen
Review the selected snaps.
In the screenshot, only powershell is selected.
Select Done and press Enter.
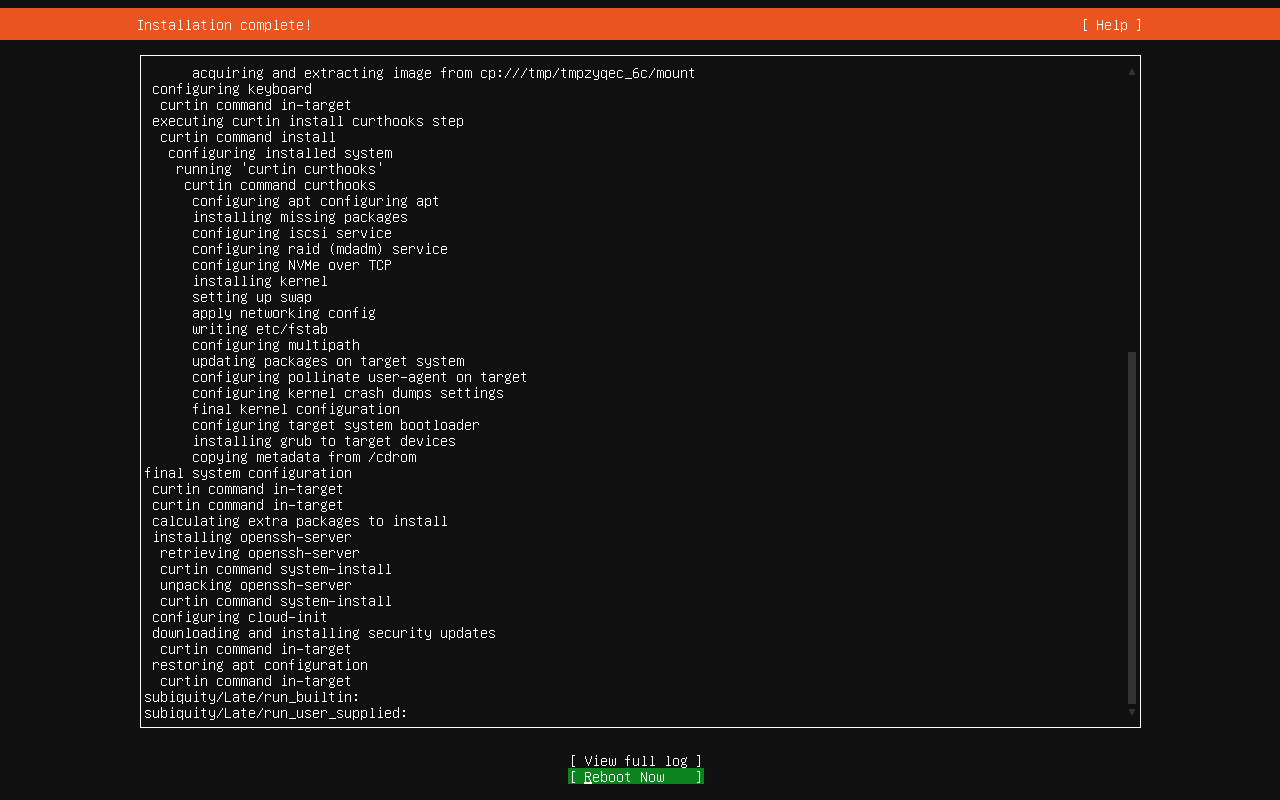
26. Wait for Installation to Complete
Ubuntu now installs the system.
This can take several minutes. The installer shows progress messages while it installs the operating system, the bootloader, updates, OpenSSH, and any selected snaps.
When the screen says Installation complete!, select Reboot Now and press Enter.
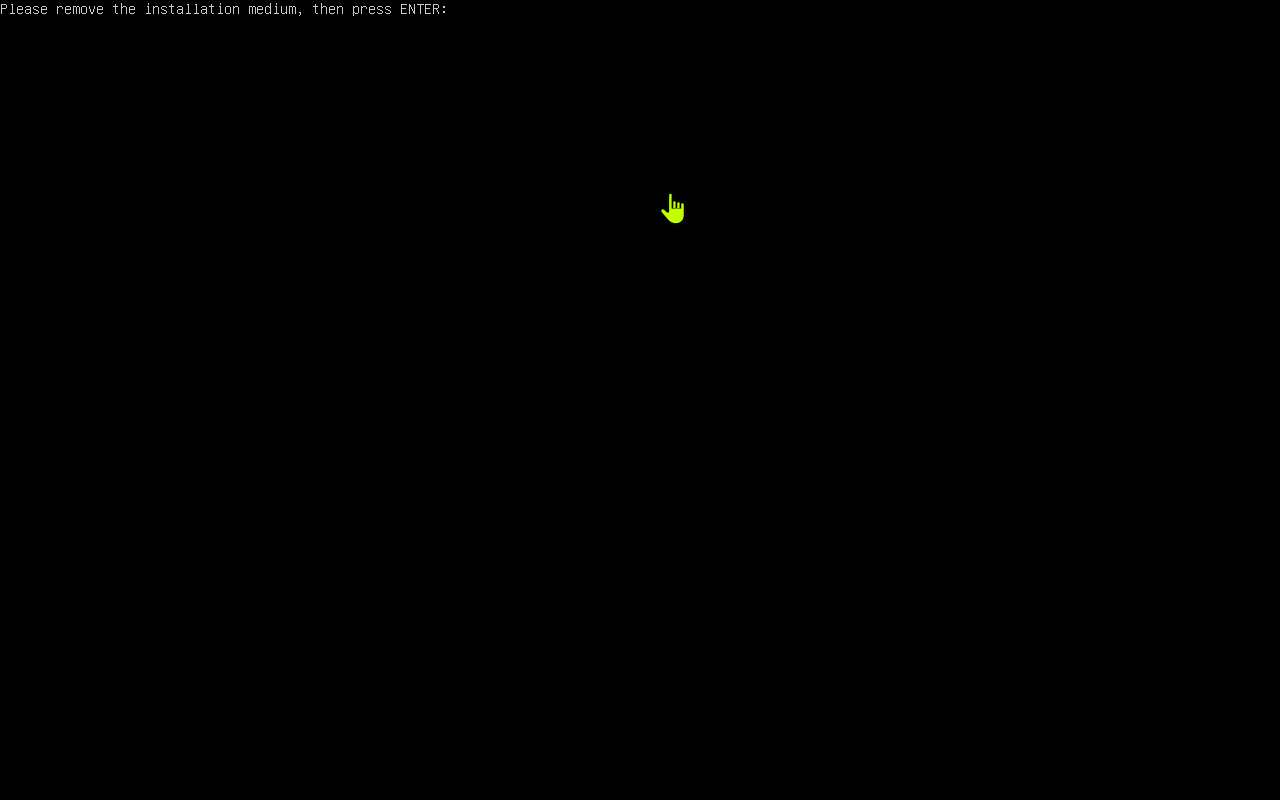
27. Remove the Installer and Press Enter
After rebooting, Ubuntu asks:
Please remove the installation medium, then press ENTER:
Remove the USB installer or disconnect the ISO from the virtual machine.
Then press Enter.
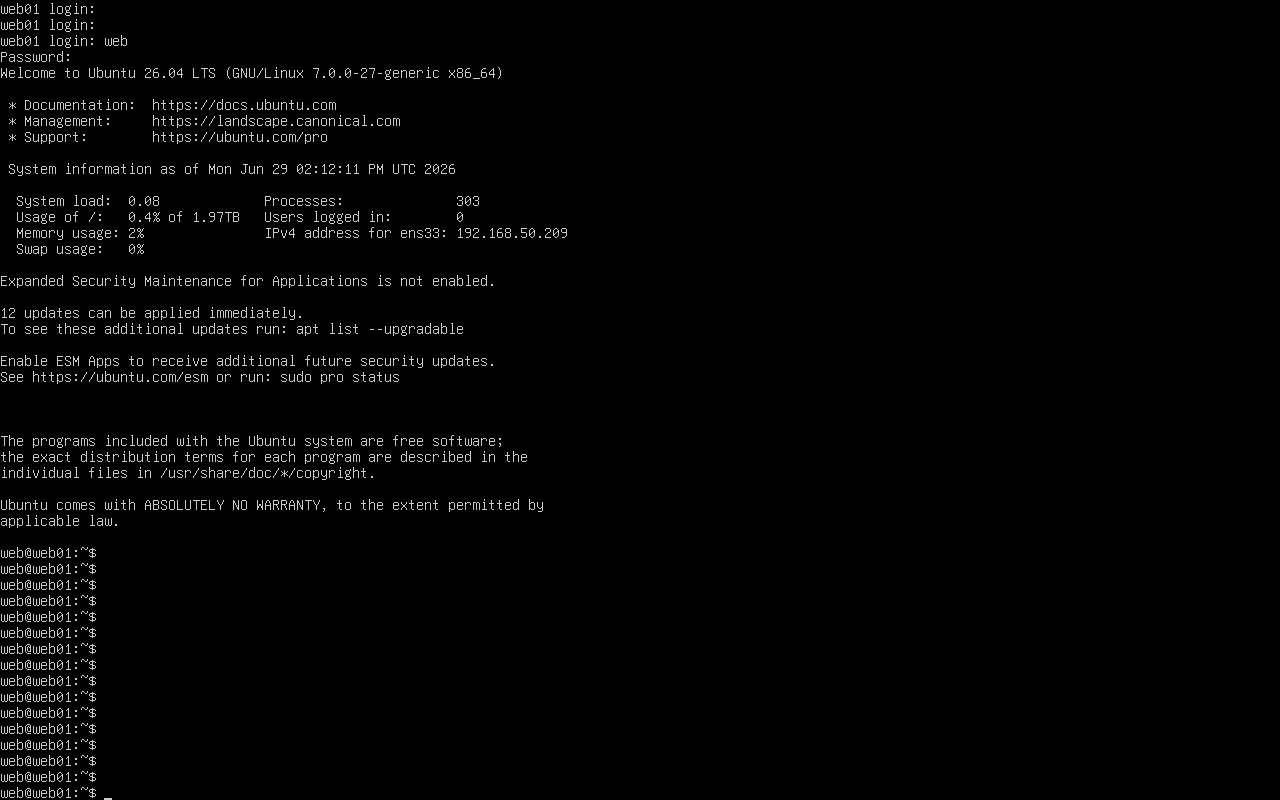
28. Log In to Ubuntu
When the server starts, you will see a login prompt.
In this example, the server name is web01, and the username is web.
Type the username and press Enter.
Type the password and press Enter. The password may not show while you type. That is normal.
After login, you should see a command prompt similar to:
web@web01:~$
This means Ubuntu is installed and you are logged in.
After the First Login
After Ubuntu is installed, it is a good idea to update it.
At the prompt, type:
sudo apt update
sudo apt upgrade
Press Enter after each command.
If Ubuntu asks for your password, enter the same password you created during the profile step.
Quick Checklist
- Language selected.
- Keyboard layout selected.
- Ubuntu Server selected.
- Network configured.
- Proxy left blank unless required.
- Ubuntu mirror confirmed.
- Disk partition created.
- Destructive disk warning confirmed.
- User profile created.
- Ubuntu Pro skipped or enabled.
- OpenSSH installed if remote access is needed.
- Optional snaps selected.
- Installation completed.
- Installer media removed.
- Server rebooted.
- Login tested.