Create an Internal Certificate Authority for Private Websites

Chrome may display Privacy error, Not secure, Your connection is not private, or NET::ERR_CERT_AUTHORITY_INVALID when it cannot build a trusted certificate chain for a website. An internal website can solve this without buying a certificate from an internet-based Certificate Authority. The organization can create its own internal Certificate Authority, use it to sign certificates, and tell its managed computers to trust that authority.
This is useful for private websites, development systems, dashboards, appliances, and services that should not be available to the public internet.
It also solves a common browser message:
Your connection is not private
NET::ERR_CERT_AUTHORITY_INVALID
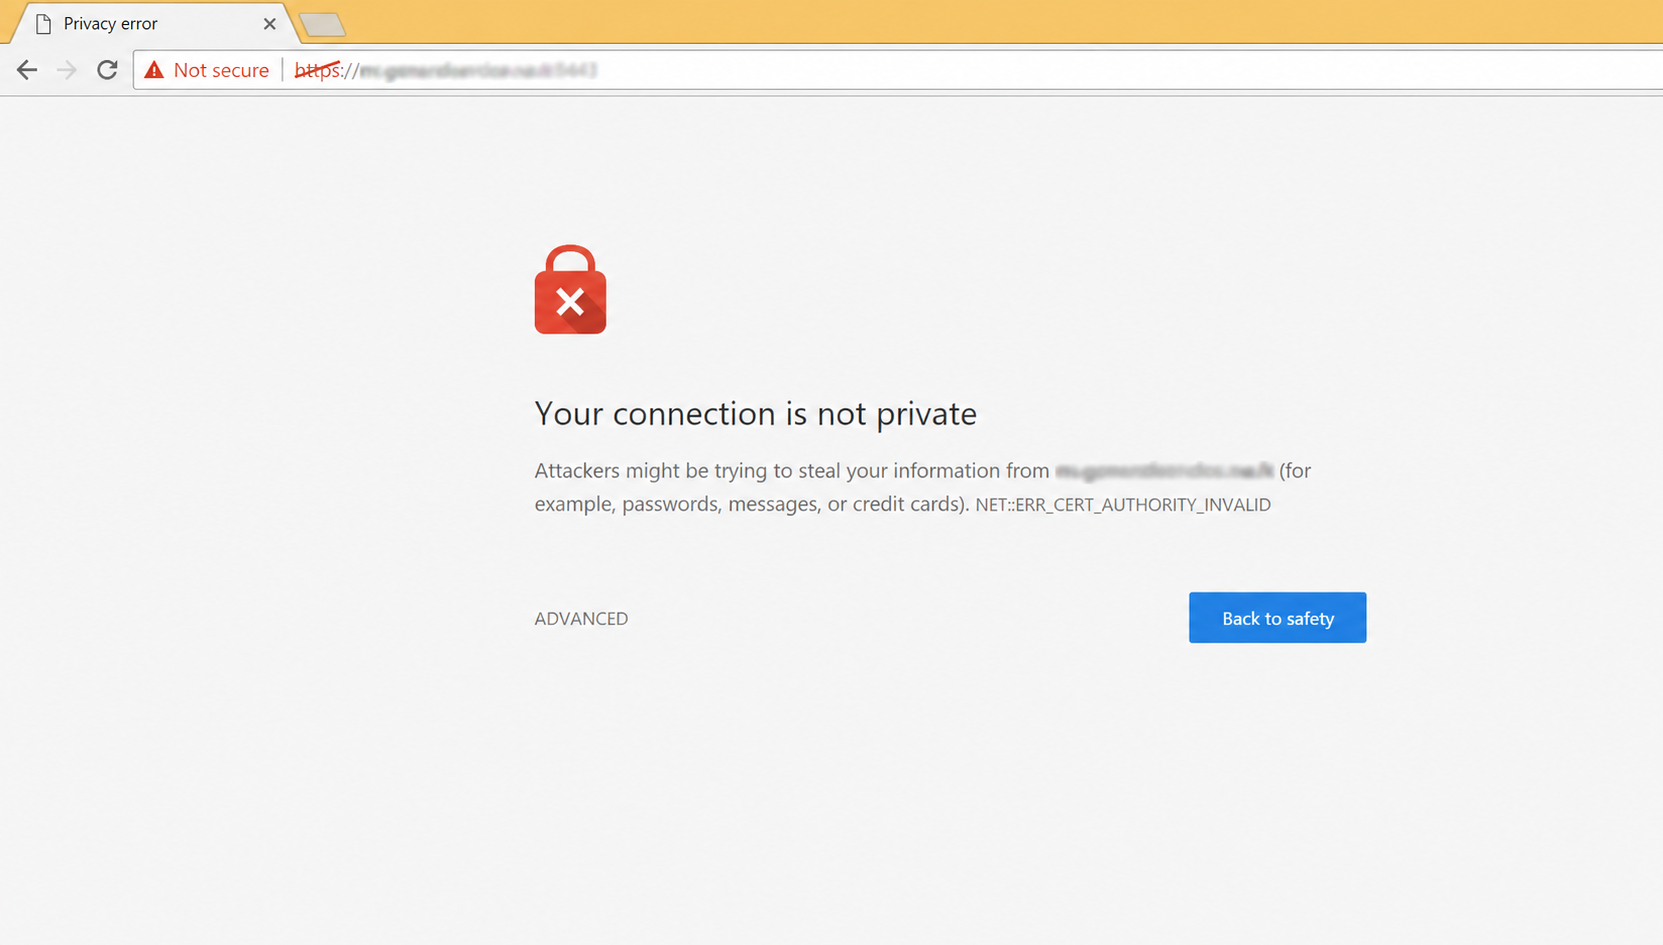
Chrome's certificate warning shows Your connection is not private and the error code NET::ERR_CERT_AUTHORITY_INVALID when the certificate authority is not trusted.
That message does not always mean encryption is missing. It often means the browser does not recognize the authority that signed the website certificate. Creating an internal CA and securely installing its public certificate on managed devices gives the browser a private chain of trust.
What the Chrome Privacy Error Means
The supplied Chrome screenshot contains several useful clues:
- Privacy error is the browser tab title for the warning page.
- Not secure means Chrome has not accepted the site's HTTPS identity.
- Your connection is not private is Chrome's main certificate warning.
- Attackers might be trying to steal your information is the browser's general warning because it cannot confirm the server's trusted identity.
NET::ERR_CERT_AUTHORITY_INVALIDis the specific error code. It means Chrome does not trust the Certificate Authority that issued the site certificate or cannot build a valid chain to a trusted root.
For an internal site, common causes include a self-signed website certificate, a missing internal root CA on the computer, a missing intermediate certificate, or a Cloudflare Origin CA certificate being used for a direct browser connection. The solution in this guide is to create a controlled internal CA and deploy its public root certificate to the devices that should trust the private website.
This guide uses these example names:
Internal CA:     internal-ca.example.com
Internal site:   app.internal.example.com
The names use example.com, which is reserved for documentation. Replace them with names from your own internal DNS domain.
The Three Files in Plain English
Three file types take part in this process:
- A
KEYfile holds a private key. It is secret and must be protected. - A
CSRfile is a Certificate Signing Request. It asks a CA to issue a certificate for a name and public key. - A
PEMfile is a text container. In this guide, PEM files hold public certificates.
The website creates its own KEY and uses it to create a CSR. The internal CA checks and signs the CSR, producing the website's PEM certificate. The website then uses its PEM certificate and KEY together when accepting HTTPS connections.
Website KEY -> Website CSR -> Internal CA signs it -> Website PEM
The website's private KEY never needs to leave the website server. The CSR contains the public key, not the private key.
What the Internal CA Creates
The internal CA has its own pair of files:
internal-ca.example.com.key   Secret CA private key
internal-ca.example.com.pem   Public CA certificate
The CA's private KEY signs website certificates. If someone steals this key, that person can create certificates your managed computers may trust. Keep it encrypted, tightly restrict access, and do not copy it to website servers.
The CA's PEM certificate is public. It is the file installed in the trusted root certificate store on managed computers.
For an important production environment, keep the root CA key offline and create a separate intermediate CA for daily signing. The direct root-signing example below is simpler and can be suitable for a small, carefully controlled environment, but it should not be treated as a full enterprise PKI design.
Step 1: Create a Protected CA Directory
Run these commands on a protected Linux computer used to manage the internal CA:
sudo mkdir -p /opt/internal-ca
sudo chmod 700 /opt/internal-ca
cd /opt/internal-ca
Do not place the CA's private key in a public web directory. The name internal-ca.example.com identifies the CA in this example; it does not mean the root private key should be exposed by a website or signing API.
Step 2: Create the CA Private KEY
Create an encrypted 4096-bit RSA private key:
openssl genpkey \
  -algorithm RSA \
  -aes-256-cbc \
  -pkeyopt rsa_keygen_bits:4096 \
  -out internal-ca.example.com.key
OpenSSL asks for a password. Store that password in an approved password vault and protect the key file:
sudo chmod 600 internal-ca.example.com.key
Do not send this file to users or web servers.
Step 3: Create the CA's Public PEM Certificate
Use the CA private key to create a self-signed root certificate:
openssl req \
  -x509 \
  -new \
  -sha256 \
  -days 3650 \
  -key internal-ca.example.com.key \
  -out internal-ca.example.com.pem \
  -subj "/O=Example Internal/CN=internal-ca.example.com" \
  -addext "basicConstraints=critical,CA:TRUE,pathlen:0" \
  -addext "keyUsage=critical,keyCertSign,cRLSign" \
  -addext "subjectKeyIdentifier=hash"
The important setting is:
CA:TRUE
It marks this certificate as a Certificate Authority that can sign other certificates. OpenSSL's certificate extension documentation states that a CA certificate must have its Basic Constraints CA value set to TRUE.
The CA now has:
internal-ca.example.com.key   Keep secret
internal-ca.example.com.pem   Distribute as the trusted root
Step 4: Trust the Internal CA on Managed Devices
Copy only internal-ca.example.com.pem to company-managed computers and install it in their Trusted Root Certification Authorities store.
Common deployment methods include:
- Active Directory Group Policy for Windows domain computers.
- Microsoft Intune or another device-management platform.
- Apple configuration profiles or mobile-device management.
- The operating system certificate-management tools on Linux.
For a single Windows test computer, open an Administrator Command Prompt in the folder containing the PEM and run:
certutil -addstore -f Root internal-ca.example.com.pem
For many Windows computers, use Group Policy or device management instead of manually importing the certificate on every machine.
Only administrators should deploy a trusted root certificate. Trusting a root CA gives it substantial authority on that device. Confirm the certificate fingerprint through a separate trusted channel before deploying it.
Some browsers and applications can use a certificate store different from the operating system store. Test every browser and application your organization supports.
Step 5: Create the Website Private KEY
On the server for app.internal.example.com, create a private key:
sudo mkdir -p /etc/nginx/certs
cd /etc/nginx/certs

sudo openssl genpkey \
  -algorithm RSA \
  -pkeyopt rsa_keygen_bits:2048 \
  -out app.internal.example.com.key

sudo chmod 600 app.internal.example.com.key
This KEY belongs only to this website. It is not the CA key and it should not be sent to the CA.
If several servers use the same wildcard certificate and key, compromise of any one server exposes that shared identity. Separate certificates and keys are usually safer when they are practical.
Step 6: Create the Website CSR
Create the Certificate Signing Request from the website's private key:
openssl req \
  -new \
  -sha256 \
  -key app.internal.example.com.key \
  -out app.internal.example.com.csr \
  -subj "/O=Example Internal/CN=app.internal.example.com" \
  -addext "subjectAltName=DNS:app.internal.example.com"
The CSR contains the requested DNS name and the website's public key. It is safe to send the CSR to the internal CA through an approved process because it does not contain the private key.
The subjectAltName entry is especially important. Modern browsers verify the hostname against the certificate's Subject Alternative Name, commonly called SAN. The name in the address bar must match a SAN entry.
To request several names for the same server, list them in the SAN extension:
-addext "subjectAltName=DNS:app.internal.example.com,DNS:app.example.com"
Only request names the internal CA has verified and approved.
Step 7: Check the CSR
Before signing it, inspect the request:
openssl req \
  -in app.internal.example.com.csr \
  -noout \
  -verify \
  -text
Confirm that the public key, organization, and every requested DNS name are correct. A real internal CA process should verify ownership and authorization instead of automatically signing every CSR it receives.
Step 8: Sign the CSR with the Internal CA
On the CA computer, create a file named server.ext:
basicConstraints=critical,CA:FALSE
keyUsage=critical,digitalSignature,keyEncipherment
extendedKeyUsage=serverAuth
subjectAltName=DNS:app.internal.example.com
subjectKeyIdentifier=hash
authorityKeyIdentifier=keyid,issuer
The CA:FALSE setting says this is a website certificate, not another CA. The SAN identifies the website, and serverAuth permits the certificate to be used by a TLS server.
Sign the CSR:
openssl x509 \
  -req \
  -sha256 \
  -days 397 \
  -in app.internal.example.com.csr \
  -CA internal-ca.example.com.pem \
  -CAkey internal-ca.example.com.key \
  -CAcreateserial \
  -out app.internal.example.com.pem \
  -extfile server.ext
OpenSSL asks for the CA key password. It then creates:
app.internal.example.com.pem
Send this signed website certificate back to the website server. Never send internal-ca.example.com.key.
The first signing operation also creates a serial-number file. Preserve the CA's signing records, serial state, issued certificates, and revocation information. A production CA needs proper issuance logging, renewal, revocation, backup, and recovery procedures.
Step 9: Configure NGINX
The website server should now have these two files:
/etc/nginx/certs/app.internal.example.com.pem
/etc/nginx/certs/app.internal.example.com.key
Configure NGINX to use the certificate and private key:
server {
    listen 443 ssl;
    server_name app.internal.example.com;

    ssl_certificate     /etc/nginx/certs/app.internal.example.com.pem;
    ssl_certificate_key /etc/nginx/certs/app.internal.example.com.key;

    root /var/www/app;
    index index.html;
}
Test and reload NGINX:
sudo nginx -t
sudo systemctl reload nginx
Internal DNS must point app.internal.example.com to the correct server. A trusted certificate does not create the DNS record.
What Happens During the TLS Connection
When a user visits https://app.internal.example.com, the files work together like this:
- NGINX sends
app.internal.example.com.pemto the browser. - The browser confirms that the SAN covers
app.internal.example.com. - The browser checks the certificate dates and allowed uses.
- The browser sees that the internal CA signed the website certificate.
- The browser checks its trusted root store for
internal-ca.example.com.pem. - NGINX uses
app.internal.example.com.keyto prove it controls the private key matching the certificate. - The browser and server agree on temporary session keys and start an encrypted connection.
The website private key is used during the TLS process, but it is never sent to the browser. The CA private key is not involved in each website visit; it was used earlier when the CA signed the website certificate.
The Complete File Flow
Internal CA
|-- internal-ca.example.com.key
|   Secret CA key used to sign certificates
|
`-- internal-ca.example.com.pem
    Public root certificate installed on managed devices

Website
|-- app.internal.example.com.key
|   Secret website key that stays on the web server
|
|-- app.internal.example.com.csr
|   Request sent to the internal CA
|
`-- app.internal.example.com.pem
    Signed certificate returned by the internal CA
In one sentence: the website's KEY creates the CSR, the CA signs the CSR to create the website PEM, and managed devices trust that PEM because they already trust the CA's PEM.
Verify the Certificate Before Using It
Display the certificate's subject, issuer, dates, and SAN:
openssl x509 \
  -in app.internal.example.com.pem \
  -noout \
  -subject \
  -issuer \
  -dates \
  -ext subjectAltName
Verify the signature against the internal CA:
openssl verify \
  -CAfile internal-ca.example.com.pem \
  app.internal.example.com.pem
A successful result is:
app.internal.example.com.pem: OK
After NGINX is running, test the live TLS service:
openssl s_client \
  -connect app.internal.example.com:443 \
  -servername app.internal.example.com \
  -CAfile internal-ca.example.com.pem \
  -verify_return_error
If the Browser Still Shows a Privacy Error
Check each part of the trust chain:
- The internal CA PEM is installed as a trusted root, not merely imported as a regular personal certificate.
- The URL exactly matches a DNS name in the website certificate's SAN.
- The certificate is currently valid and the computer's clock is correct.
- Internal DNS points to the server that received the signed certificate.
- NGINX is presenting the new certificate rather than an old or default certificate.
- The website PEM matches the website KEY.
- The browser or application recognizes the operating system's trust configuration.
- The browser was restarted after the root CA was deployed.
You can check whether the website certificate matches its private key by comparing their public keys:
openssl x509 \
  -in app.internal.example.com.pem \
  -pubkey \
  -noout | openssl sha256

openssl pkey \
  -in app.internal.example.com.key \
  -pubout | openssl sha256
The two SHA-256 results should be identical. These hashes are only being used for comparison; they do not expose the private key.
Internal Certificates Are Not Public Certificates
An internal CA is useful only when you control the devices that must trust it. It does not make a certificate trusted by random visitors on the internet.
Use an established public CA when a website must work for customers, partners, unmanaged personal devices, or the general public. Use an internal CA for private services whose client trust settings your organization manages.
Do not use a Cloudflare Origin CA certificate for a site that users access directly. Those certificates are designed for the connection between Cloudflare and the origin server, so a normal browser connecting directly to the origin will not trust them.
Keep the CA Safe
Creating the root certificate is the easy part. Protecting and operating the CA is the important part.
- Encrypt and restrict the CA private key.
- Keep the root key offline when possible.
- Use an intermediate CA for regular certificate issuance in larger environments.
- Approve requested names before signing them.
- Give each website its own private key when practical.
- Use short website-certificate lifetimes and renew them before expiration.
- Maintain serial numbers and a record of every issued certificate.
- Plan how to revoke and replace certificates after a server or key compromise.
- Back up CA material securely and test recovery procedures.
- Remove the trusted root from managed devices if the CA is retired or compromised.
An internal CA prevents browser trust errors only because managed devices have been told to trust it. That trust should be treated as a security boundary, not merely as a way to remove a warning screen.