0 1 0 1 0 1 0 1 0 1 0 1 0 1 0 1 0 1 0 1 0 1 0 1 0 1 0 1 0 1 0 1 0 1 0 1 0 1 0 1 0 1 0 1 0 1 0 1 0 1 0 1 0 1 0 1 0 1 0 1 0 1 0 1 0 1 0 1 0 1 0 1 0 1 0 1 0 1 0 1 0 1 0 1 0 1 0 1 0 1 0 1 0 1 0 1 0 1 0 1 0 1 0 1 0 1 0 1 0 1 0 1 0 1 0 1 0 1 0 1 0 1 0 1 0 1 0 1 0 1 0 1 0 1 0 1 0 1 0 1
JPPINTO
  • Home
  • Blog
  • Certifications
  • About
  • Contact
  • Shop
  • Gallery
  • Current Setup
Contact

Search

July 21, 2010 / Windows 2003, Windows 2008, Windows 7, Windows Vista

How to change the listening port for RDC/RDP (Remote Desktop Connection)
Tags: change port mstsc, change port remote desktop, change rdc port, change rdp port, remote desktop port
Featured image for How to change the listening port for RDC/RDP (Remote Desktop Connection)

In this article we will change the default listening port for RDC/RDP from 3389 to 5555. This is useful when you want to prevent external or internal users from scanning port 3389 to see what computers are available to connect to. Sure they can scan port 5555 however it is another step for an intruder and they will need to figure out what is running on port 5555 once they see it is open.

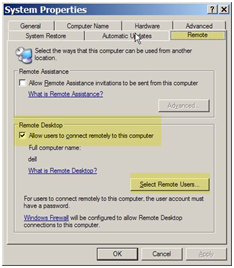
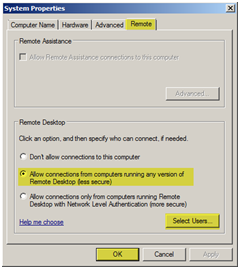
Enable Remote Desktop:

Right click “My Computer”

Select “Properties”

Click “Advanced system settings”, depending on your version of Windows you might be able to skip this step

Select the “Remote” tab

Select “Allow users to connect remotely to this computer” or “Allow connections from computers running any version of Remote Desktop”

Press “Select Remote Users” or “Select Users”

Select the users you want to be able to login remotely.

Press “OK”, until you close out of System Properties

“

By default RDC/RDP runs on port 3389. When you connect using Remote Desktop Connection it uses port 3389 even though you cannot see it.

Changing the RDP Port:

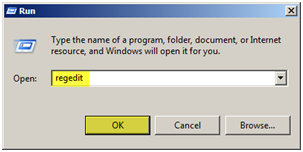
Select Start, Run then type “Regedit”

Press “OK”
Locate and then click the following registry subkey:

HKEY_LOCAL_MACHINE\System\CurrentControlSet\Control\TerminalServer\WinStations\RDP-Tcp\PortNumber

You can see the “PortNumber” value is set to 3389 by default.
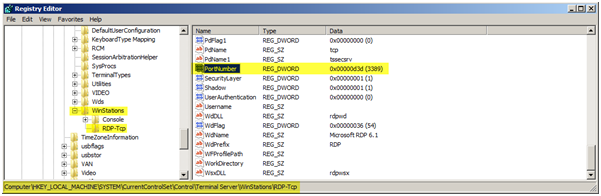
Select “PortNumber”

On the Edit menu, click Modify

Select “Decimal” – *very important*

Type the new port number of “5555”

Click “OK”
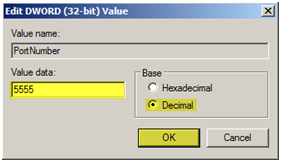
You can close REGEDIT at this point. A restart or reboot is NOT required for this change.

Open Remote Desktop Connection (“mstsc” from the run window, or you can usually find this under “Start > All Programs > Accessories”)

Type the SERVERNAME which you changed to RDP port on and append :5555 to it

So you should enter SERVERNAME:5555

Press “Connect”

Be sure to open port 5555 on any firewalls that may be in the way
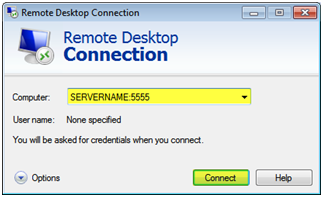
“

Post Views: 234
<- Remote Desktop Connection (RDP/RDC) will automatically resize when moving it
Create custom Columns & Content Types in SharePoint 2007 (MOSS) using C# ->

Categories

  • Active Directory (5)
  • AI (3)
  • Amazon Cloud Services (1)
  • AWS (2)
  • Blazor (1)
  • C# (C-Sharp) (3)
  • CI/CD Pipelines (1)
  • Cloud (1)
  • Cloudflare (2)
  • Codex (1)
  • Containers (4)
  • Deployment (2)
  • Development (5)
  • DNS (1)
  • Docker (3)
  • Email (1)
  • Family (1)
  • General (5)
  • IIS 6.0 (4)
  • IIS 7.0 (10)
  • IIS 8.0 (1)
  • Infrastructure as Code (IaC) (1)
  • Kubernetes (3)
  • Linux (9)
  • Microsoft 365 (2)
  • MySQL (1)
  • Office 2010 (1)
  • PHP (1)
  • PowerShell (11)
  • Productivity (1)
  • Security (1)
  • Servers (9)
  • SharePoint 2007 (8)
  • SharePoint 2010 (19)
  • SharePoint 2013 (2)
  • SharePoint Online (1)
  • SMTP (4)
  • SQL Server 2008 (1)
  • SQL Server 2008 R2 (1)
  • SQL Server 2012 (2)
  • SQL Server 2019 (1)
  • SSL (1)
  • Travel (1)
  • Troubleshooting (1)
  • Ubuntu (9)
  • Uncategorized (1)
  • URL Rewrite (2)
  • Visual Studio 2019 (1)
  • Visual Studio Code (1)
  • Windows 10 (7)
  • Windows 2003 (9)
  • Windows 2008 (18)
  • Windows 2012 (6)
  • Windows 7 (3)
  • Windows Firewall (1)
  • Windows Vista (1)
  • WordPress (3)
  • WP-CLI (3)

Recent Posts

  • GPT-5.6 Sol Changes How We Prompt—and How We Write AGENTS.md
  • Protect a Domain That Does Not Send Email with SPF, DMARC, and Null MX
  • Turning Our Atlanta Vacation Photos into a Video with PowerShell
  • Bulk Create Cloudflare Origin CA Certificates with PowerShell
  • Test a Cloudflare Global API Key Connection with PowerShell

Advertisement

Tags

agents.md ai coding agents aws bash cloudflare cloud storage codex context engineering developer workflow dev to production dns externalize blob externalize sharepoint data full installation http redirect https IIS IIS installation index server configuration installing cumulative updates linux load balance central administration microsoft 365 nginx powerpoint powershell redirect http to https s3 server setup sharepoint 2010 cumulative updates sharepoint 2010 farm build sharepoint 2010 farm configuration sharepoint 2010 farm installation sharepoint data externalization SMTP ssl storagepoint ubuntu web server windows Windows 7 windows server 2008 wordpress wp-cli x86
© 2026 JPPinto.com. All rights reserved.